In Part 2 of this primer, we’re going to keep things simple… another Hello World program. Sorry, maybe Part 3 will cover something more exciting?
Lets create a new project. Follow the same steps as in Part 1 if you’re unfamiliar, but here is what we’re using this time:

This time, we’re going to leave the boilerplate code alone. It’s roughly 150 lines that registers a few event handlers, but otherwise, doesn’t do anything.
Lets define a touchpanel so we can handle a button press and send some feedback! At the top of the ControlSystem class, define a touchpanel like so:
public class ControlSystem : CrestronControlSystem
{
    private Tsw1060 _tsw;

    /// ...snip...
}
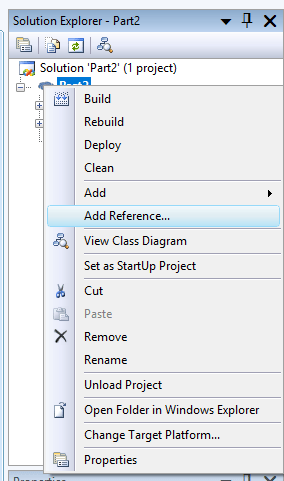
When you type this in, you’ll notice that IntelliSense doesn’t recognize the Tsw1060 class. We need to add a reference to the UI library and include it in our program. Right-click on the Part2 project in the Solution Explorer window and select Add Reference…
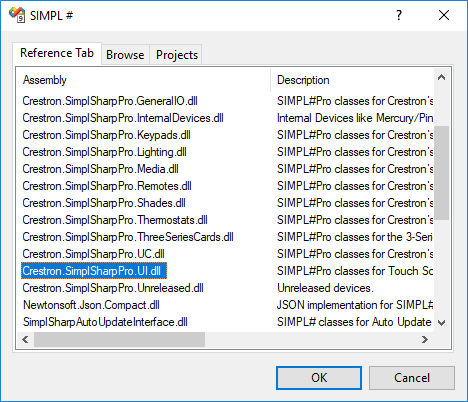
Scroll through the list and select Crestron.SimpleSharpPro.UI.dll . Hit OK to add it to our project:
At the top of ControlSystem.cs, we need to add a using statement to be able to use the classes within Crestron.SimpleSharpPro.UI:
using System;
using Crestron.SimplSharp;                    // For Basic SIMPL# Classes
using Crestron.SimplSharpPro;                 // For Basic SIMPL#Pro classes
using Crestron.SimplSharpPro.CrestronThread;  // For Threading
using Crestron.SimplSharpPro.Diagnostics;     // For System Monitor Access
using Crestron.SimplSharpPro.DeviceSupport;   // For Generic Device Support
using Crestron.SimplSharpPro.UI;              // For Touchpanels
If you go back to where we added private Tsw1060 _tsw to the top of our ControlSystem class, you’ll see IntelliSense recognizes it now. OK, we have a touchpanel, but we haven’t done anything with it yet. Add the following code to InitializeSystem:
public override void InitializeSystem()
{
    try
    {
        _tsw = new Tsw1060(0x03, this);
        _tsw.OnlineStatusChange += new OnlineStatusChangeEventHandler(_tsw_OnlineStatusChange);
        _tsw.SigChange += new SigEventHandler(_tsw_SigChange);
        _tsw.Register();
    }
    catch (Exception e)
    {
        ErrorLog.Error("Error in InitializeSystem: {0}", e.Message);
    }
}
You may have noticed when typing in this code, IntelliSense gives you suggestions for naming the event handlers and will even create some stub methods for you just by pressing Tab. Lets look at the OnlineStatusChange event first:
void _tsw_OnlineStatusChange(GenericBase currentDevice, OnlineOfflineEventArgs args)
{
    throw new NotImplementedException();
}
When our touchpanel comes online or goes offline, this event handler will throw a NotImplementedException. Unhandled exceptions end up printing to the error log on the processor. So if you see exceptions in the error log, look at the stack trace information, and handle them properly with try / catch blocks in your code. We’re going to leave this one here for now so we can see what it looks like in the error log.
In our SigChange event handler, we’re going to replace the stub code with this:
void _tsw_SigChange(BasicTriList currentDevice, SigEventArgs args)
{
    if (args.Sig.Number == 10)
    {
        if (args.Sig.BoolValue)
        {
            currentDevice.StringInput[1].StringValue = "Hello world!";
        }
    }
}
It may not be immediately obvious, but when digital join 10 is pressed, this code will send “Hello world!” to serial join 1 on the touchpanel. Actually, digital, analog, or serial join 10 will follow the same code path here (which is a bug, but we’ve designed our touchpanel file not to care). SigChange will fire for a press and a release of digital join 10, so we check to see if the BoolValue is true (same as digital high). Let’s also add a button to clear the text:
void _tsw_SigChange(BasicTriList currentDevice, SigEventArgs args)
{
    if (args.Sig.Number == 10)
    {
        if (args.Sig.BoolValue)
        {
            currentDevice.StringInput[1].StringValue = "Hello world!";
        }
    }
    if (args.Sig.Number == 11)
    {
        if (args.Sig.BoolValue)
        {
            currentDevice.StringInput[1].StringValue = "";
        }
    }
}
Now button join 11 will clear the text on our touchpanel.
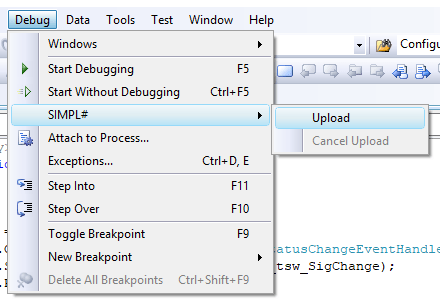
OK, build this code and send it to your control processor. If you’ve already setup your control system connection, you can quickly send the program using the Debug > SIMPL# > Upload menu.
When we check the error log on the processor (using the errlog command), we can see the NotImplementedException raised by our _tsw_OnlineStatusChange handler.

Now the moment we’ve been waiting for…

Summary
In this part we learned:
- How to add code to the template boilerplate
- Adding references to other libraries to our project
- Defining a touchpanel and event handlers
- Checking the error log for unhandled exceptions
- Responding to device events and sending feedback
Source Code
All source code and touchpanel layouts for this series are available freely on GitHub at https://github.com/kielthecoder/SimplSharpPrimer.

Thanks for posting these tutorials .. VERY helpful!
LikeLike
Thanks for posting these tutorials on SIMPL Sharp Pro … VERY helpful!
LikeLike
Thank you very much, it seems so simple explained like this: D
LikeLike