In this part, we’ll work on adding the NVX devices into our program. Let’s review the overall design real quick to see what we have left:

We have 3 encoders and 3 decoders that need to be added:
- Encoders
- Camera – 1
- Laptop – 1
- Video Codec – 1
- Decoders
- Display – 1
- Video Codec – 2
- Camera Input
- Content Input
Make sure to add a reference to Crestron.SimplSharpPro.DM to your project and add using Crestron.SimplSharpPro.DM.Streaming; to the top of your program. Now we can define some class members to keep track of our endpoints:
public class ControlSystem : CrestronControlSystem
{
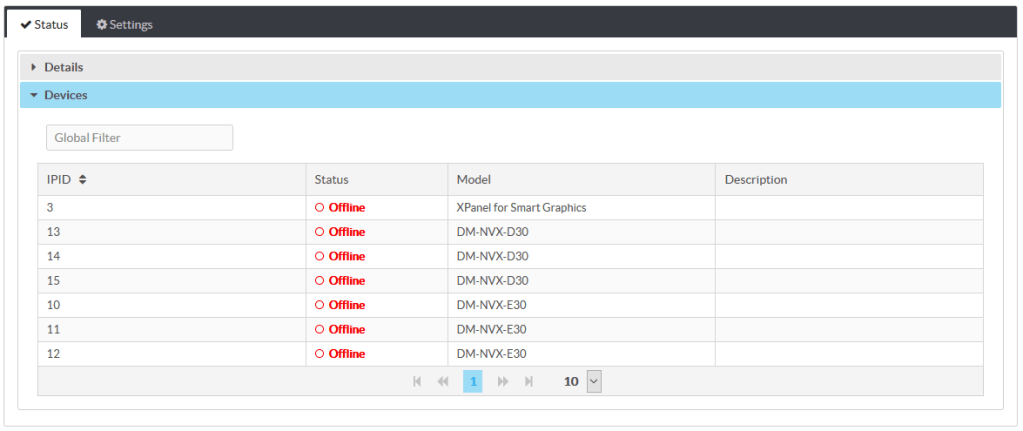
private XpanelForSmartGraphics tp1;
private DmNvxE30 txLaptop, txCamera, txCodec;
private DmNvxD30 rxDisplay, rxCodecCamera, rxCodecContent;
private bool bSystemPowerOn;
Create the objects and register them:
public override void InitializeSystem()
{
    try
    {
        // Touchpanels

        tp1 = new XpanelForSmartGraphics(0x03, this);

        tp1.OnlineStatusChange += tp_OnlineChange;
        tp1.UserSpecifiedObject = new Action<bool>(online => { if (online) UpdateFeedback(); });

        tp1.SigChange += tp_SigChange;
        tp1.BooleanOutput[(uint)SystemJoins.PowerToggle].UserObject = new Action<bool>(press => { if (press) ToggleSystemPower(); });
        tp1.BooleanOutput[(uint)SystemJoins.PowerTransition].UserObject = new Action<bool>(done => { if (done) UpdatePowerStatusText(); });

        tp1.Register();

        // Receivers

        rxDisplay = new DmNvxD30(0x13, this);
        rxDisplay.Register();

        rxCodecCamera = new DmNvxD30(0x14, this);
        rxCodecCamera.Register();

        rxCodecContent = new DmNvxD30(0x15, this);
        rxCodecContent.Register();

        // Transmitters

        txLaptop = new DmNvxE30(0x10, this);
        txLaptop.Register();

        txCamera = new DmNvxE30(0x11, this);
        txCamera.Register();

        txCodec = new DmNvxE30(0x12, this);
        txCodec.Register();
    }
    catch (Exception e)
    {
        ErrorLog.Error("Error in InitializeSystem: {0}", e.Message);
    }
}
The way NVX streaming works is pretty neat. Transmitters start up and begin flooding the network with AV packets. If we grab the stream info and feed it to one of the receivers, it will subscribe to that stream. For now, lets make it so the Display always shows the Codec and the Camera and Laptop route to their respective inputs on the codec. First, we need to add some online event handlers to grab the stream info. Let’s modify InitializeSystem slightly to do this for our transmitters:
// Transmitters

txLaptop = new DmNvxE30(0x10, this);
txLaptop.SourceTransmit.StreamChange += tx_StreamChange;
txLaptop.UserSpecifiedObject = new Action<string>(url => { SetStreamURL(rxCodecContent, url); });
txLaptop.Register();

txCamera = new DmNvxE30(0x11, this);
txCamera.SourceTransmit.StreamChange += tx_StreamChange;
txCamera.UserSpecifiedObject = new Action<string>(url => { SetStreamURL(rxCodecCamera, url); });
txCamera.Register();

txCodec = new DmNvxE30(0x12, this);
txCodec.SourceTransmit.StreamChange += tx_StreamChange;
txCodec.UserSpecifiedObject = new Action<string>(url => { SetStreamURL(rxDisplay, url); });
txCodec.Register();
We need to create the tx_StreamChange handler which will grab the new stream URL and pass it to our callback attached to the UserSpecifiedObject on our transmitters:
public void tx_StreamChange(Stream stream, StreamEventArgs args)
{
    var obj = (DmNvxE30)stream.Owner;
    var uo = obj.UserSpecifiedObject;

    if (uo is Action<string>)
    {
        var func = (Action<string>)uo;
        func(obj.Control.ServerUrlFeedback.StringValue);
    }
}
Our callbacks will call SetStreamURL with the receiver we want to point and the new URL:
void SetStreamURL(DmNvxD30 rx, string url)
{
    rx.Control.ServerUrl.StringValue = url;
}
Build this and send it to the VC-4 server. I called my new room PART4. Unfortunately, I can’t test this right now because I don’t have any NVX gear setup. But I think it should work ok?
In Part5 I’ll actually build and test this setup to make sure we’re on the right track. For now, you can grab the latest code in my GitHub.

Viel Glück in Ihrem Blog, wie ich weiterhin regelmäßig zu folgen. Yolanthe Nowell Burnett
LikeLiked by 1 person