This series of posts is going to put together some of what we learned in the Simple Sharp Primer and VC-4 posts. For an idea, here is what we’re going to build in Part 1:
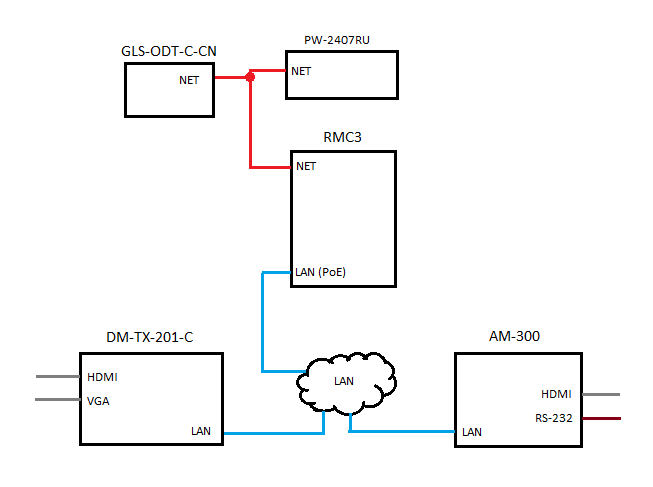
Let’s take a quick inventory of what’s in this system:
- RMC3 is the brain deciding all the business logic
- DM-TX-201-C is the transmitter for our laptop connection at the table
- AM-300 is our receiver/wireless presentation at the display
- GLS-ODT-C-CN is our occupancy sensor
- PW-2407RU is power for our sensor (since RMC3 doesn’t provide power over Cresnet)
How should our system function? Here’s a typical user story:
- User walks into room.
- Occupancy sensor triggers and display powers on, defaulting to AM-300 help screen
- If user connects a laptop, that is displayed on screen instead
- When the user disconnects laptop, image goes back to AM-300 help screen
- If the room is vacant for 15 minutes, the display powers off
I think we can bang this out in one blog post, don’t you? It’s not so different from what we’ve already done.
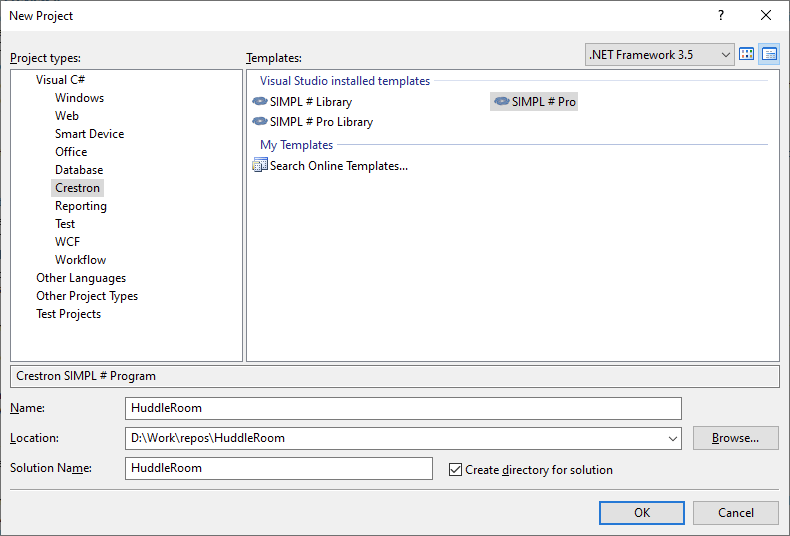
Create a new project
Create a new project in VS2008 (since we’re working with a 3-series processor). If you need a refresher on this part, read through my Primer series. Here’s a screenshot of my New Project dialog:
Open up ControlSystem.cs and replace it with the bare-minimum program:
using System;
using Crestron.SimplSharp;
using Crestron.SimplSharpPro;
using Crestron.SimplSharpPro.CrestronThread;

namespace HuddleRoom
{
    public class ControlSystem : CrestronControlSystem
    {
        public ControlSystem()
            : base()
        {
            try
            {
                Thread.MaxNumberOfUserThreads = 40;
            }
            catch (Exception e)
            {
                ErrorLog.Error("Error in ControlSystem constructor: {0}", e.Message);
            }
        }

        public override void InitializeSystem()
        {
            try
            {
                CrestronConsole.PrintLine("MaxNumberOfUserThreads = {0}", Thread.MaxNumberOfUserThreads);
            }
            catch (Exception e)
            {
                ErrorLog.Error("Error in InitializeSystem: {0}", e.Message);
            }
        }
    }
}
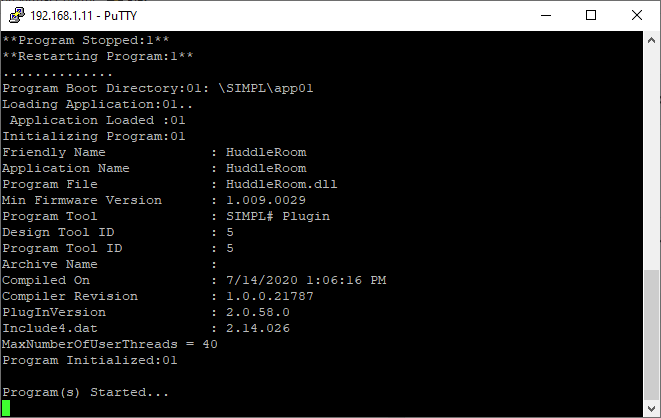
Build this and load it to your processor (it doesn’t have to be an RMC3). Once the program has started, you’ll see it report back how many user threads are allowed:
Add devices
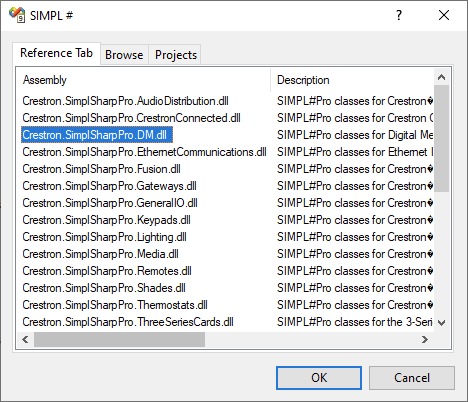
Let’s define all of our devices as members of our ControlSystem class. Don’t forget to add the necessary references to our project so we can pull in the correct assemblies:
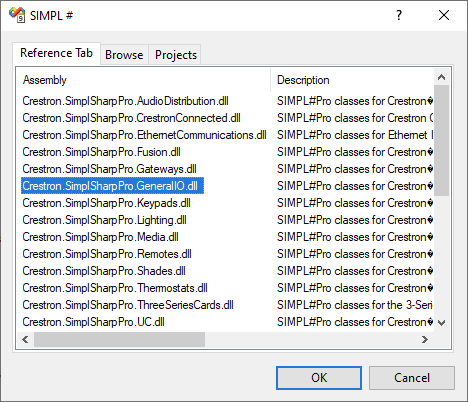
At the top of the ControlSystem.cs file, add some using directives:
using System;
using Crestron.SimplSharp;
using Crestron.SimplSharpPro;
using Crestron.SimplSharpPro.CrestronThread;
using Crestron.SimplSharpPro.DM.AirMedia;
using Crestron.SimplSharpPro.DM.Endpoints.Transmitters;
using Crestron.SimplSharpPro.GeneralIO;
Now we can add a couple members to our ControlSystem class. Add these at the top of the class declaration, just above the constructor:
public class ControlSystem : CrestronControlSystem
{
    private Am300 _dmRx;
    private DmTx201C _dmTx;
    private GlsOdtCCn _occSensor;

    public ControlSystem()
        : base()
    {
We also want to easily track which equipment is actually available and registered in our system, so let’s also add these properties just below the devices we just added:
public class ControlSystem : CrestronControlSystem
{
    private Am300 _dmRx;
    private DmTx201C _dmTx;
    private GlsOdtCCn _occSensor;

    public bool HasAirMedia { get; private set; }
    public bool HasLaptop { get; private set; }
    public bool HasOccSensor { get; private set; }

    public ControlSystem()
        : base()
    {
Now we can register our devices in InitializeSystem:
public override void InitializeSystem()
{
    HasAirMedia = false;
    HasLaptop = false;
    HasOccSensor = false;

    try
    {
        if (this.SupportsEthernet)
        {
            _dmRx = new Am300(0x15, this);
            if (_dmRx.Register() != eDeviceRegistrationUnRegistrationResponse.Success)
                ErrorLog.Error("Unable to register {0} on IP ID {1}!", _dmRx.Name, _dmRx.ID);

            _dmTx = new DmTx201C(0x14, this);
            if (_dmTx.Register() != eDeviceRegistrationUnRegistrationResponse.Success)
                ErrorLog.Error("Unable to register {0} on IP ID {1}!", _dmTx.Name, _dmTx.ID);
        }

        if (this.SupportsCresnet)
        {
            _occSensor = new GlsOdtCCn(0x97, this);
            if (_occSensor.Register() == eDeviceRegistrationUnRegistrationResponse.Success)
                ErrorLog.Error("Unable to register {0} on Cresnet ID {1}!", _occSensor.Name, _occSensor.ID);
        }
    }
    catch (Exception e)
    {
        ErrorLog.Error("Error in InitializeSystem: {0}", e.Message);
    }
}
Build and load this program, and you should see a normal startup, but now there’s an Update Request from the _occSensor object:

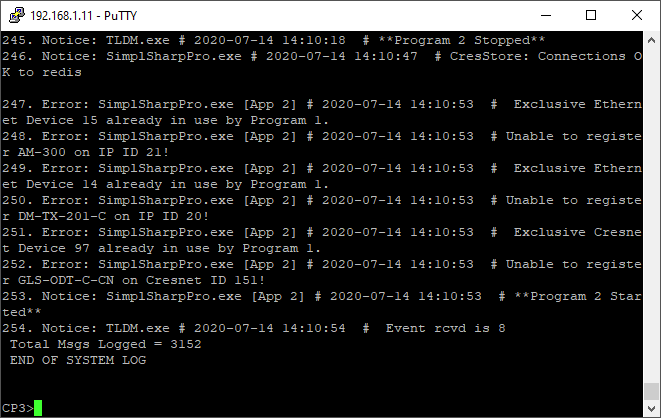
Hypothetically, if we were to load the same program into Slot 2 on the processor, our registrations will fail because they’re already being allocated to the program in Slot 1. If we did this and check errlog, we can see the registrations fail (it prints our error messages):
Occupancy sensor
Let’s start by adding an event handler for the occupancy sensor:
if (this.SupportsCresnet)
{
    _occSensor = new GlsOdtCCn(0x97, this);
    _occSensor.GlsOccupancySensorChange += OnOccupancySensorChange;
    if (_occSensor.Register() != eDeviceRegistrationUnRegistrationResponse.Success)
        ErrorLog.Error("Unable to register {0} on Cresnet ID {1}!", _occSensor.Name, _occSensor.ID);
}
And define OnOccupancySensorChange after InitializeSystem:
private void OnOccupancySensorChange(GlsOccupancySensorBase device, GlsOccupancySensorChangeEventArgs args)
{
    switch (args.EventId)
    {
        case GlsOccupancySensorBase.RoomOccupiedFeedbackEventId:
            break;
        case GlsOccupancySensorBase.RoomVacantFeedbackEventId:
            break;
    }
}
Remember our user story: we want the system to turn off after 15 minutes of no activity. We can use a timer to track this. At the top of our class, let’s add another member:
public class ControlSystem : CrestronControlSystem
{
    private Am300 _dmRx;
    private DmTx201C _dmTx;
    private GlsOdtCCn _occSensor;
    private CTimer _vacancyTimer;
Now in InitializeSystem, we’ll create the timer but tell it not to start right away. I also removed the HasAirMedia, HasLaptop, and HasOccSensor properties for now since I don’t think I’m going to end up using them yet:
public override void InitializeSystem()
{
    try
    {
        _vacancyTimer = new CTimer(OnRoomVacantTimeout, Timeout.Infinite);

        if (this.SupportsEthernet)
        {
            _dmRx = new Am300(0x15, this);
            if (_dmRx.Register() != eDeviceRegistrationUnRegistrationResponse.Success)
                ErrorLog.Error("Unable to register {0} on IP ID {1}!", _dmRx.Name, _dmRx.ID);

            _dmTx = new DmTx201C(0x14, this);
            if (_dmTx.Register() != eDeviceRegistrationUnRegistrationResponse.Success)
                ErrorLog.Error("Unable to register {0} on IP ID {1}!", _dmTx.Name, _dmTx.ID);
        }

        if (this.SupportsCresnet)
        {
            _occSensor = new GlsOdtCCn(0x97, this);
            _occSensor.GlsOccupancySensorChange += OnOccupancySensorChange;
            if (_occSensor.Register() != eDeviceRegistrationUnRegistrationResponse.Success)
                ErrorLog.Error("Unable to register {0} on Cresnet ID {1}!", _occSensor.Name, _occSensor.ID);
        }
    }
    catch (Exception e)
    {
        ErrorLog.Error("Error in InitializeSystem: {0}", e.Message);
    }
}
And let’s create the OnRoomVacantTimeout callback, TurnSystemOn, and TurnSystemOff methods:
private void OnRoomVacantTimeout(Object o)
{
    TurnSystemOff();
}

public void TurnSystemOn()
{
    // TODO
}

public void TurnSystemOff()
{
    // TODO
}
Let’s modify OnOccupancySensorChange to start/stop our timer based on the room occupancy status:
private void OnOccupancySensorChange(GlsOccupancySensorBase device, GlsOccupancySensorChangeEventArgs args)
{
    switch (args.EventId)
    {
        case GlsOccupancySensorBase.RoomOccupiedFeedbackEventId:
            _vacancyTimer.Stop();
            TurnSystemOn();
            break;
        case GlsOccupancySensorBase.RoomVacantFeedbackEventId:
            _vacancyTimer.Reset(15 * 60 * 60 * 1000); // 15 minutes (in ms)
            break;
    }
}
As of right now, TurnSystemOn and TurnSystemOff don’t do anything. We’ll fill this out as soon as we get control of our other devices.
AM-300
We’re going to use an AM-300 as a DM receiver and wireless presentation source. It’s going to handle a lot. I’m really hoping this doesn’t turn into an unwieldy amount of code. First let’s figure out how we control which input we’re looking at on-screen.
Let’s create ShowAirMedia and ShowLaptop methods to make this easier:
public void ShowAirMedia()
{
    try
    {
        _dmRx.DisplayControl.VideoOut = AmX00DisplayControl.eAirMediaX00VideoSource.AirMedia;
    }
    catch (Exception e)
    {
        ErrorLog.Error("Exception in ShowAirMedia: {0}", e.Message);
    }
}

public void ShowLaptop()
{
    try
    {
        _dmRx.DisplayControl.VideoOut = AmX00DisplayControl.eAirMediaX00VideoSource.DM;
    }
    catch (Exception e)
    {
        ErrorLog.Error("Exception in ShowLaptop: {0}", e.Message);
    }
}
Wrapping these in try / catch blocks is important because not all AirMedias feature the same input selections. If we try to do something the hardware doesn’t support, we’ll read about it in the Error Log later.
Since the AM-300 also has an RS-232 port we’re going to use for display control, let’s configure that in InitializeSystem:
_dmRx = new Am300(0x15, this);
_dmRx.ComPorts[1].SetComPortSpec(displayComSpec);
_dmRx.ComPorts[1].SerialDataReceived += OnDisplayDataReceived;
if (_dmRx.Register() != eDeviceRegistrationUnRegistrationResponse.Success)
    ErrorLog.Error("Unable to register {0} on IP ID {1}!", _dmRx.Name, _dmRx.ID);
We can create displayComSpec at the top of InitializeSystem since we only need it to call SetComPortSpec:
public override void InitializeSystem()
{
    ComPort.ComPortSpec displayComSpec = new ComPort.ComPortSpec {
        BaudRate = ComPort.eComBaudRates.ComspecBaudRate9600,
        DataBits = ComPort.eComDataBits.ComspecDataBits8,
        Parity = ComPort.eComParityType.ComspecParityNone,
        StopBits = ComPort.eComStopBits.ComspecStopBits1,
        SoftwareHandshake = ComPort.eComSoftwareHandshakeType.ComspecSoftwareHandshakeNone,
        HardwareHandShake = ComPort.eComHardwareHandshakeType.ComspecHardwareHandshakeNone
    };

    try
    {
Next, create the OnDisplayDataReceived event handler. We’ll figure out what it does later:
private void OnDisplayDataReceived(ComPort port, ComPortSerialDataEventArgs args)
{
    // TODO
}
Let’s revisit TurnSystemOn and TurnSystemOff and make sure we send the appropriate power commands to the display (just assume a Sharp monitor for now):
public void TurnSystemOn()
{
    _dmRx.ComPorts[1].Send("POWR1   \r");
}

public void TurnSystemOff()
{
    _dmRx.ComPorts[1].Send("POWR0   \r");
}
DM-TX-201-C
Lastly, we need to handle when the user plugs their laptop into the DM transmitter at the table. We want to automatically switch the AirMedia to and from the DM input.
Add a namespace to the top of the program that I forgot to include earlier:
using System;
using Crestron.SimplSharp;
using Crestron.SimplSharpPro;
using Crestron.SimplSharpPro.CrestronThread;
using Crestron.SimplSharpPro.DM.AirMedia;
using Crestron.SimplSharpPro.DM.Endpoints;
using Crestron.SimplSharpPro.DM.Endpoints.Transmitters;
using Crestron.SimplSharpPro.GeneralIO;
Let’s update InitializeSystem to register some new event handlers:
_dmTx = new DmTx201C(0x14, this);
_dmTx.HdmiInput.InputStreamChange += OnLaptopHDMI;
_dmTx.VgaInput.InputStreamChange += OnLaptopVGA;
if (_dmTx.Register() != eDeviceRegistrationUnRegistrationResponse.Success)
    ErrorLog.Error("Unable to register {0} on IP ID {1}!", _dmTx.Name, _dmTx.ID);
And let’s create them below where our other handlers are defined:
private void OnLaptopHDMI(EndpointInputStream inputStream, EndpointInputStreamEventArgs args)
{
    var hdmiStream = inputStream as EndpointHdmiInput;

    switch (args.EventId)
    {
        case EndpointInputStreamEventIds.SyncDetectedFeedbackEventId:
            if (hdmiStream.SyncDetectedFeedback.BoolValue)
                ShowLaptop();
            else
                ShowAirMedia();

            break;
    }
}

private void OnLaptopVGA(EndpointInputStream inputStream, EndpointInputStreamEventArgs args)
{
    var vgaStream = inputStream as EndpointVgaInput;

    switch (args.EventId)
    {
        case EndpointInputStreamEventIds.SyncDetectedFeedbackEventId:
            if (vgaStream.SyncDetectedFeedback.BoolValue)
                ShowLaptop();
            else
                ShowAirMedia();

            break;
    }
}
When the user plugs or unplugs their laptop, we check the value of SyncDetectedFeedback on the appropriate input to see whether there is a signal or not. If there’s a signal, we switch to showing Laptop (on the AM-300), and if not, we switch back to Airmedia.
And done!
Actually, I think that covers everything in the user story at the start of this post. Not bad! It’s roughly 150 lines of tightly-coupled code! I think in the next post, we’ll explore decoupling the program a bit and try to factor out a few classes to help us see what’s going on a little easier.
So until next time, please check out GitHub for the code for this project.

This is an excellent tutorial with real world examples. Thank you so much , it really helped me!
LikeLiked by 1 person
Thank you, Rick! Glad it was helpful.
LikeLike