In this part, we’re going to explore how to interact with Smart Objects from SIMPL# Pro. You’ll need to have an XPanel layout to follow along. You can download my project from GitHub. It looks something like this:
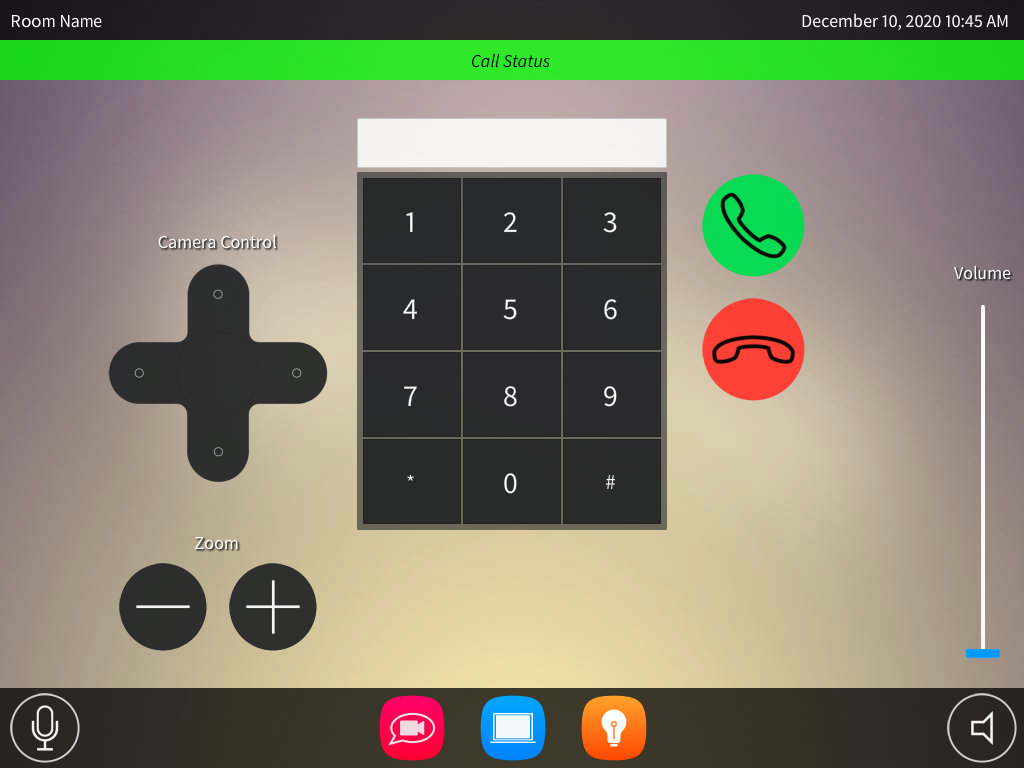
Open the VTP file and explore it a little bit. We have a few Smart Objects that we’ll need to interface with:
- A horizontal list named “Menu List” with ID 1
- A simple keypad named “VTC Keypad” with ID 2
- A DPad named “Camera DPad” with ID 3
OK, time to create a new project in VS2008!
SgProDemo
I’ve created a new solution in Visual Studio named SgProDemo and have added the Part7 project to it. And like usual, I’ve cut down ControlSystem.cs to just the essentials:
using System;
using Crestron.SimplSharp;
using Crestron.SimplSharpPro;
using Crestron.SimplSharpPro.CrestronThread;

namespace Part7
{
    public class ControlSystem : CrestronControlSystem
    {
        public ControlSystem()
            : base()
        {
            try
            {
                Thread.MaxNumberOfUserThreads = 100;
            }
            catch (Exception e)
            {
                ErrorLog.Error("Error in Constructor: {0}", e.Message);
            }
        }

        public override void InitializeSystem()
        {
            try
            {

            }
            catch (Exception e)
            {
                ErrorLog.Error("Error in InitializeSystem: {0}", e.Message);
            }
        }
    }
}
Build your solution, should be no errors.
Instantiate the XPanel
Before we can instantiate an XPanel, we need to make sure we’ve added the proper references for it. Right click on References in the Solution Explorer and add Crestron.SimplSharpPro.UI to your project. And at the top of ControlSystem.cs, make sure to include the correct using statements:
using System;
using Crestron.SimplSharp;
using Crestron.SimplSharpPro;
using Crestron.SimplSharpPro.CrestronThread;
using Crestron.SimplSharpPro.DeviceSupport;
using Crestron.SimplSharpPro.UI;

namespace Part7
{
In our ControlSystem class, we can declare a member for it:
namespace Part7
{
    public class ControlSystem : CrestronControlSystem
    {
        private XpanelForSmartGraphics _tp;

        public ControlSystem()
            : base()
        {
And in InitializeSystem we can instantiate it within the try block:
public override void InitializeSystem()
{
    try
    {
        _tp = new XpanelForSmartGraphics(0x03, this);

        var result = _tp.Register();

        if (result != eDeviceRegistrationUnRegistrationResponse.Success)
            ErrorLog.Warn("Problem registering XPanel: {0}", result);
    }
    catch (Exception e)
    {
        ErrorLog.Error("Error in InitializeSystem: {0}", e.Message);
    }
}
Build your solution, load to your controller, then see if you can connect the XPanel. Nothing much will happen but you’ll see an update request on the console:
Program Initialized:01
Update request from IP-ID-03 in Program 01
Program(s) Started...
Smart Graphics Definitions File
When you compile a VTP project with Smart Graphics controls, VisionTools also spits out an SGD file. This file lists the Smart Graphics Extenders that show up when you program in SIMPL Windows. It’s a text file you can open and inspect, but the file format resembles the SMW format (i.e.: not very readable).
For example, here’s part of the definition for our Menu List control:
[
ObjTp=Symbol
Name=SG Primer XPANEL_Menu_Menu List.ced
Hint=Menu List (Smart Object ID=1)
Code=1
SGControlType=Icon List Horizontal
SGControlName=Menu List
...snip...
;Define the cues, and signal types  each input, output and parameter.
InputCue1=[~UNUSED3~]
InputSigType1=Digital
OutputCue1=Item 1 Pressed
OutputSigType1=Digital
...snip...
CedH=1
SmartObjId=1d
]
SIMPL Windows takes this information and presents it graphically:

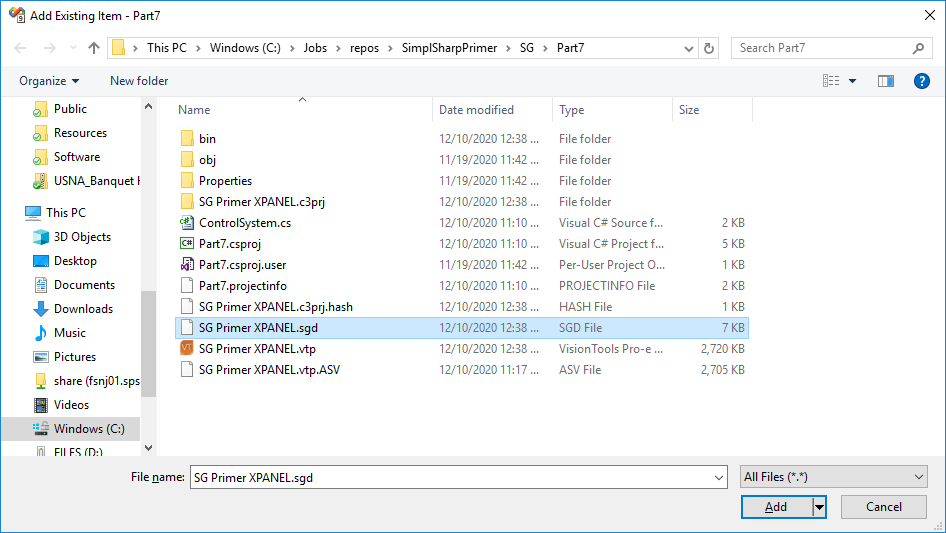
We can also use the SGD file to reference signal names in SIMPL# Pro, but we need to load the file into memory at runtime. To do this, we need to make sure the file is present in our archive when we build it. Similarly to how we added IR drivers to our project in SIMPL# Pro Primer: Part 3, we need to add the SGD file to our project. Right click on your project and select Add Existing Item. You’ll need to locate the SGD file and Add it to your project:
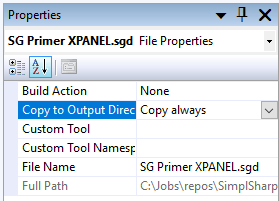
With the SG Primer XPANEL.sgd file selected in your Solution Explorer, make sure the properties are set to Copy always under Copy to Output Directory:
Now when we build our solution, it will include the SGD file in the final CPZ file.
To get our program to find the SGD file, we need to use a few classes in the Crestron.SimplSharp.CrestronIO namespace:
using System;
using Crestron.SimplSharp;
using Crestron.SimplSharp.CrestronIO;
using Crestron.SimplSharpPro;
using Crestron.SimplSharpPro.CrestronThread;
using Crestron.SimplSharpPro.DeviceSupport;
using Crestron.SimplSharpPro.UI;
Then we ask _tp to load the file from the correct directory:
public override void InitializeSystem()
{
    try
    {
        _tp = new XpanelForSmartGraphics(0x03, this);
        _tp.LoadSmartObjects(Directory.GetApplicationDirectory() +
            Path.DirectorySeparatorChar + "SG Primer XPANEL.sgd");

        var result = _tp.Register();

        if (result != eDeviceRegistrationUnRegistrationResponse.Success)
            ErrorLog.Warn("Problem registering XPanel: {0}", result);
    }
    catch (Exception e)
    {
        ErrorLog.Error("Error in InitializeSystem: {0}", e.Message);
    }
}
Let’s add an event handler for our menu button presses:
_tp.LoadSmartObjects(Directory.GetApplicationDirectory() +
    Path.DirectorySeparatorChar + "SG Primer XPANEL.sgd");

_tp.SmartObjects[1].SigChange += _tp_MenuSigChange;

var result = _tp.Register();
Right after InitializeSystem, add:
private void _tp_MenuSigChange(GenericBase dev, SmartObjectEventArgs args)
{
    CrestronConsole.PrintLine("{0}: {1}", args.Sig.Type, args.Sig.Name);
}
Build this, send to your controller, then watch the console while you press buttons on the Menu List. You’ll see something like:
UShort: Item Clicked
Bool: Item 1 Pressed
Bool: Item 1 Pressed
UShort: Item Clicked
Bool: Item 2 Pressed
Bool: Item 2 Pressed
UShort: Item Clicked
Bool: Item 3 Pressed
Bool: Item 3 Pressed
These names correspond to the same signal names we saw when viewing the SGD file in SIMPL Windows. If we didn’t load the SGD file, we’d get something like this in the console instead:
UShort: UShort Sig Number 4
Bool: Bool Sig Number 1
Bool: Bool Sig Number 1
UShort: UShort Sig Number 4
Bool: Bool Sig Number 2
Bool: Bool Sig Number 2
UShort: UShort Sig Number 4
Bool: Bool Sig Number 3
Bool: Bool Sig Number 3
So you don’t technically need to load the SGD file, but it will make our code more readable as long as we know which signal names map to what.
Horizontal List
We need to keep track of which menu we’re showing. Add this to the ControlSystem class:
public class ControlSystem : CrestronControlSystem
{
    private XpanelForSmartGraphics _tp;
    private ushort _menu;

    public ControlSystem()
        : base()
    {
Then rewrite our _tp_MenuSigChange handler:
private void _tp_MenuSigChange(GenericBase dev, SmartObjectEventArgs args)
{
    if (args.Sig.Name == "Item Clicked")
    {
        _menu = args.Sig.UShortValue;
        _tp_UpdateMenu();
    }
}
And just below _tp_MenuSigChange, add this new method:
private void _tp_UpdateMenu()
{
    _tp.BooleanInput[21].BoolValue = (_menu == 1);  // Video Call
    _tp.BooleanInput[22].BoolValue = (_menu == 2);  // Presentation
    _tp.BooleanInput[23].BoolValue = (_menu == 3);  // Lights
}
This won’t technically break before make, but since it happens so quickly and it’s only driving the UI, who cares?
Simple Keypad
Let’s add logic for our keypad now. Since we’ll use it to build a dial string, we need to keep track of whatever digits were entered:
public class ControlSystem : CrestronControlSystem
{
    private XpanelForSmartGraphics _tp;
    private ushort _menu;
    private string _dialString;

    public ControlSystem()
        : base()
    {
Register a new event handler in InitializeSystem:
public override void InitializeSystem()
{
    try
    {
        _dialString = "";

        _tp = new XpanelForSmartGraphics(0x03, this);
        _tp.LoadSmartObjects(Directory.GetApplicationDirectory() +
            Path.DirectorySeparatorChar + "SG Primer XPANEL.sgd");

        _tp.SmartObjects[1].SigChange += _tp_MenuSigChange;
        _tp.SmartObjects[2].SigChange += _tp_KeypadSigChange;

        var result = _tp.Register();

        if (result != eDeviceRegistrationUnRegistrationResponse.Success)
            ErrorLog.Warn("Problem registering XPanel: {0}", result);
    }
    catch (Exception e)
    {
        ErrorLog.Error("Error in InitializeSystem: {0}", e.Message);
    }
}
And lets add the new event handler underneath _tp_UpdateMenu:
private void _tp_KeypadSigChange(GenericBase dev, SmartObjectEventArgs args)
{
    if (args.Sig.BoolValue) // Button press
    {
        if (_dialString.Length < 50)
        {
            if (args.Sig.Name == "Misc_1")
                _dialString += "*";
            else if (args.Sig.Name == "Misc_2")
                _dialString += "#";
            else
                _dialString += args.Sig.Name;

            _tp_UpdateDialString();
        }
    }
}
Since presses and releases will trigger this event handler, we want to only respond to presses when BoolValue is true. Except for the two miscellaneous keys, we can just take the signal name and append it to our _dialString. For santiy’s sake, we keep the length of the string less than 50 characters. Then add _tp_UpdateDialString beneath that:
private void _tp_UpdateDialString()
{
    _tp.StringInput[11].StringValue = _dialString;
}
This method just takes whatever is in _dialString and sends it to the text field on the XPanel.
DPad
Our last Smart Object is the DPad. This one won’t be too different from our other event handlers. We’ll track pan/tilt positions and spit them out to the console while our camera control moves. Add this to our class to support that:
public class ControlSystem : CrestronControlSystem
{
    private XpanelForSmartGraphics _tp;
    private ushort _menu;
    private string _dialString;
    private short _pan;
    private short _tilt;

    public ControlSystem()
        : base()
    {
And register our new event handler in InitializeSystem:
_tp.SmartObjects[1].SigChange += _tp_MenuSigChange;
_tp.SmartObjects[2].SigChange += _tp_KeypadSigChange;
_tp.SmartObjects[3].SigChange += _tp_DPadSigChange;
And add _tp_DPadSigChange after _tp_UpdateDialString:
private void _tp_DPadSigChange(GenericBase dev, SmartObjectEventArgs args)
{
    if (args.Sig.BoolValue) // Press
    {
        if (args.Sig.Name == "Center")
        {
            _pan = 0;
            _tilt = 0;
        }
        else if (args.Sig.Name == "Up")
        {
            _ramp = new Thread(o => { return _tp_Tilt(1); }, null);
        }
        else if (args.Sig.Name == "Down")
        {
            _ramp = new Thread(o => { return _tp_Tilt(-1); }, null);
        }
        else if (args.Sig.Name == "Left")
        {
            _ramp = new Thread(o => { return _tp_Pan(-1); }, null);
        }
        else if (args.Sig.Name == "Right")
        {
            _ramp = new Thread(o => { return _tp_Pan(1); }, null);
        }
    }
    else // Release
    {
        if (args.Sig.Name == "Center")
        {
            // nothing
        }
        else
        {
            if (_ramp != null)
                _ramp.Abort();
        }
    }
}
First, we check if this is a press or release that triggered our event handler. If it’s a press, we figure out which of the 5 buttons caused it: Center, Up, Down, Left, or Right. Center is easy to handle, just set _pan and _tilt to 0. For the other buttons, I want to ramp the camera that direction. And I’d like to handle that in another thread. Depending on the direction, I either call _tp_Pan or _tp_Tilt with a positive or negative value. We also need a variable to hold onto our thread in case we need to call Abort on it when the user releases the button.
Add _ramp to the top of our class:
public class ControlSystem : CrestronControlSystem
{
    private XpanelForSmartGraphics _tp;
    private Thread _ramp;
    private ushort _menu;
    private string _dialString;
    private short _pan;
    private short _tilt;

    public ControlSystem()
        : base()
    {
Lastly, define the _tp_Pan and _tp_Tilt methods below _tp_DPadSigChange:
private object _tp_Tilt(short dir)
{
    while (true)
    {
        if (dir < 0) // Down
        {
            if (_tilt > -100)
                _tilt--;
            else
                break;
        }
        else // Up
        {
            if (_tilt < 100)
                _tilt++;
            else
                break;
        }

        CrestronConsole.PrintLine("Pan: {0}\tTilt: {1}", _pan, _tilt);
        Thread.Sleep(50);
    }

    return null;
}

private object _tp_Pan(short dir)
{
    while (true)
    {
        if (dir < 0) // Left
        {
            if (_pan > -180)
                _pan--;
            else
                break;
        }
        else // Right
        {
            if (_pan < 180)
                _pan++;
            else
                break;
        }

        CrestronConsole.PrintLine("Pan: {0}\tTilt: {1}", _pan, _tilt);
        Thread.Sleep(50);
    }

    return null;
}
I originally wrote this much simpler where I just looped around checking that the value stayed within range and added the direction on each pass. Unfortunately, if I hit the limits, the value would get stuck. Since I had to break apart left/right and up/down, I decided I might as well break out of the loop if I hit a limit. And I moved the range checking into the loop rather than the while statement since the way it worked it was always evaluating true anyway. The 20ms delay is there to keep the simulated ramping realistic to an actual camera.
Conclusion
And there you have it: the 3 Smart Objects are now programmed. Everything else in the XPanel layout is a traditional button, slider, or gauge. Those would all be handled by adding a SigChangeEventHandler to _tp. You can see that writing handlers for Smart Objects is quite a bit easier since there are a limited number of signals that can trigger them.
I wish there were a way to refer to Smart Objects by name instead of ID, but it seems like that isn’t saved anywhere. So, we just have to make sure that the Menu List is always assigned ID 1 in VT-Pro.
I’m not going to detail how I programmed the remainder of the touchpanel layout in this post, but if you grab the final code from my GitHub repository, you should be able to follow it easily.
Thanks for reading!

Great article. So just for people coming along behind me, I was having great difficulty finding the correct join number to use for particular Smart Objects. It wasn’t until I called _tp.PrintSmartObjects() that I was able to see on the console the correct join numbers that I wanted.
LikeLiked by 1 person
Thank you, Mark! I didn’t know about that method, I’ll have to play around with this some more.
LikeLike