In this part, we’ll build out a system configuration page that uses CWS to make changing system settings easier.
System Settings
Let’s create a new class that represents our system configuration. I’m going to save this as SystemSettings.cs:
using System;

namespace CwsDemo
{
    public class SystemSettings
    {
        public const int MaxInputs = 8;
        public const int MaxOutputs = 8;

        public string name { get; set; }
        public string location { get; set; }
        public string helpNumber { get; set; }

        public string[] inputs { get; set; }
        public string[] outputs { get; set; }

        public SystemSettings()
        {
            inputs = new string[MaxInputs];
            outputs = new string[MaxOutputs];

            name = "My Room";
            location = "My Office";
            helpNumber = "5555";

            for (int i = 0; i < MaxInputs; i++)
            {
                inputs[i] = String.Format("Input {0}", i + 1);
            }

            for (int i = 0; i < MaxOutputs; i++)
            {
                outputs[i] = String.Format("Output {0}", i + 1);
            }
        }
    }
}
It’s just a class full of public accessors and a constructor that gives us some default values to work with. We could read and write these values to a file if we wanted them to persist, but I want to keep things simple for the sake of this demo. Maybe I’ll return to this and add that later.
Next, lets create a RoomRequest class to expose access to our settings. We’ll start with a minimal implementation borrowed from our HelloRequest class:
using System;
using System.Collections.Generic;
using Crestron.SimplSharp;
using Crestron.SimplSharp.CrestronIO;
using Crestron.SimplSharp.WebScripting;
using Newtonsoft.Json;

namespace CwsDemo
{
    public class RoomRequest : IHttpCwsHandler
    {
        private SystemSettings _settings;

        public RoomRequest()
        {
            _settings = new SystemSettings();
        }

        public void ProcessRequest(HttpCwsContext context)
        {
            var method = context.Request.HttpMethod;

            switch (method)
            {
                case "GET":
                    break;
                case "PUT":
                    break;
                default:
                    context.Response.StatusCode = 501;  // Not implemented
                    context.Response.Write(
                        String.Format("{0} method not implemented!", method),
                        true);
                    break;
            }
        }
    }
}
OK, now we need to go into the ControlSystem class and declare the new route to our RoomRequest handler in InitializeSystem:
public override void InitializeSystem()
{
    try
    {
        _api = new HttpCwsServer("/api");

        var hello = new HttpCwsRoute("hello/");
        hello.RouteHandler = new HelloRequest();
        _api.AddRoute(hello);

        var helloName = new HttpCwsRoute("hello/{NAME}");
        helloName.RouteHandler = new HelloRequest();
        _api.AddRoute(helloName);

        var roomHandler = new RoomRequest();

        var roomProp = new HttpCwsRoute("room/{PROPERTY}");
        roomProp.RouteHandler = roomHandler;
        _api.AddRoute(roomProp);

        _api.Register();
    }
    catch (Exception e)
    {
        ErrorLog.Error("Error in InitializeSystem: {0}", e.Message);
    }
}
I’m going to reuse our RoomRequest handler for a few different routes, so that’s why I’m assigning it to the roomHandler variable. The way we’ll get named properties from our settings is by using URLs like these:
GET /room/name
GET /room/location
GET /room/helpNumber
The replies will be JSON strings like:
{ "value" = "My Room" }
{ "value" = "My Location" }
{ "value" = "5555" }
Let’s update ProcessRequest in our RoomRequest class to handle fetching these properties:
public void ProcessRequest(HttpCwsContext context)
{
    var method = context.Request.HttpMethod;

    switch (method)
    {
        case "GET":
            context.Response.StatusCode = 200;  // OK
            context.Response.ContentType = "application/json";

            if (context.Request.RouteData.Values.ContainsKey("PROPERTY"))
            {
                var prop = context.Request.RouteData.Values["PROPERTY"];
                context.Response.Write(GetPropertyJSON(prop.ToString()), true);
            }

            break;
        case "PUT":
            break;
        default:
            context.Response.StatusCode = 501;  // Not implemented
            context.Response.Write(
                String.Format("{0} method not implemented!", method),
                true);
            break;
    }
}
We’ll add the new GetPropertyJSON method just below ProcessRequest:
public string GetPropertyJSON(string propName)
{
    var obj = new Dictionary<string, string>();

    switch (propName)
    {
        case "name":
            obj["value"] = _settings.name;
            break;
        case "location":
            obj["value"] = _settings.location;
            break;
        case "helpNumber":
            obj["value"] = _settings.helpNumber;
            break;
    }

    return JsonConvert.SerializeObject(obj);
}
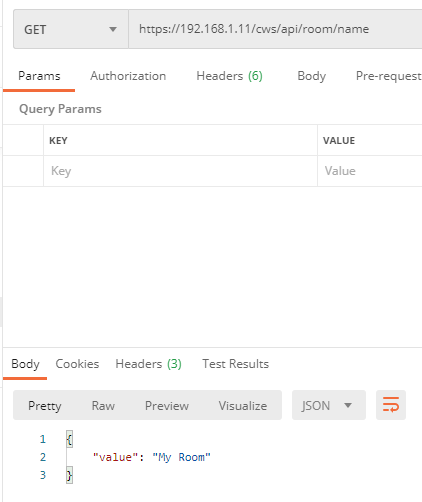
This will check for known property names and map them to the fields in our SystemSettings class. This could be done using reflection if we wanted to make it more generic, so I’ll keep that in mind for the future. If you build this and load it, you can now access settings using Postman:
What if we want to grab all the settings at once (make just one request rather than one per property)? We can add another route in ControlSystem.cs:
public override void InitializeSystem()
{
    try
    {
        _api = new HttpCwsServer("/api");

        var hello = new HttpCwsRoute("hello/");
        hello.RouteHandler = new HelloRequest();
        _api.AddRoute(hello);

        var helloName = new HttpCwsRoute("hello/{NAME}");
        helloName.RouteHandler = new HelloRequest();
        _api.AddRoute(helloName);

        var roomHandler = new RoomRequest();

        var room = new HttpCwsRoute("room");
        room.RouteHandler = roomHandler;
        _api.AddRoute(room);

        var roomProp = new HttpCwsRoute("room/{PROPERTY}");
        roomProp.RouteHandler = roomHandler;
        _api.AddRoute(roomProp);

        _api.Register();
    }
    catch (Exception e)
    {
        ErrorLog.Error("Error in InitializeSystem: {0}", e.Message);
    }
}
And update our handler in RoomRequest.cs:
public void ProcessRequest(HttpCwsContext context)
{
    var method = context.Request.HttpMethod;

    switch (method)
    {
        case "GET":
            context.Response.StatusCode = 200;  // OK
            context.Response.ContentType = "application/json";

            if (context.Request.RouteData.Values.ContainsKey("PROPERTY"))
            {
                var prop = context.Request.RouteData.Values["PROPERTY"];
                context.Response.Write(GetPropertyJSON(prop.ToString()), true);
            }
            else
            {
                context.Response.Write(JsonConvert.SerializeObject(_settings), true);
            }

            break;
        case "PUT":
            break;
        default:
            context.Response.StatusCode = 501;  // Not implemented
            context.Response.Write(
                String.Format("{0} method not implemented!", method),
                true);
            break;
    }
}
This ends up being easier: we just serialize the entire _settings object and return that. Now, we can grab all the settings in one shot:

The Frontend
We’ve got enough of an API now that we can populate an HTML page with the values in our system settings. Create a new folder named html in the solution directory and add a basic settings.html to it:
<!DOCTYPE html>
<html lang="en">
<head>
    <meta charset="UTF-8">
    <meta http-equiv="X-UA-Compatible" content="IE=edge">
    <meta name="viewport" content="width=device-width, initial-scale=1.0">
    <title>System Settings</title>
</head>
<body>
    <h1>System Settings</h1>

    <div class="group">
        <h2>Global Settings</h2>
        <div>
            <label for="name">Name:</label>
            <input type="text" id="name" />
        </div>
        <div>
            <label for="location">Location:</label>
            <input type="text" id="location" />
        </div>
        <div>
            <label for="helpNumber">Help Number:</label>
            <input type="text" id="helpNumber" />
        </div>
    </div>

    <div class="group" id="inputs">
        <h2>Inputs</h2>
    </div>

    <div class="group" id="outputs">
        <h2>Outputs</h2>
    </div>

    <script src="app.js"></script>
</body>
</html>
Also, create app.js in the same folder:
const nameInput = document.getElementById('name');
const locationInput = document.getElementById('location');
const helpNumberInput = document.getElementById('helpNumber');

async function getSettings () {
    let result = await fetch('/cws/api/room');
    let data = await result.json();

    nameInput.value = data.name;
    locationInput.value = data.location;
    helpNumberInput.value = data.helpNumber;
}

setTimeout(getSettings, 500);
We’re using the built-in fetch method to grab the current settings from our CWS API. fetch returns a Promise, so that’s why you see async and await everywhere. Copy both of these files to the HTML directory on your processor:

When you browse to the /settings.html URL, you should see values populate into the text fields:
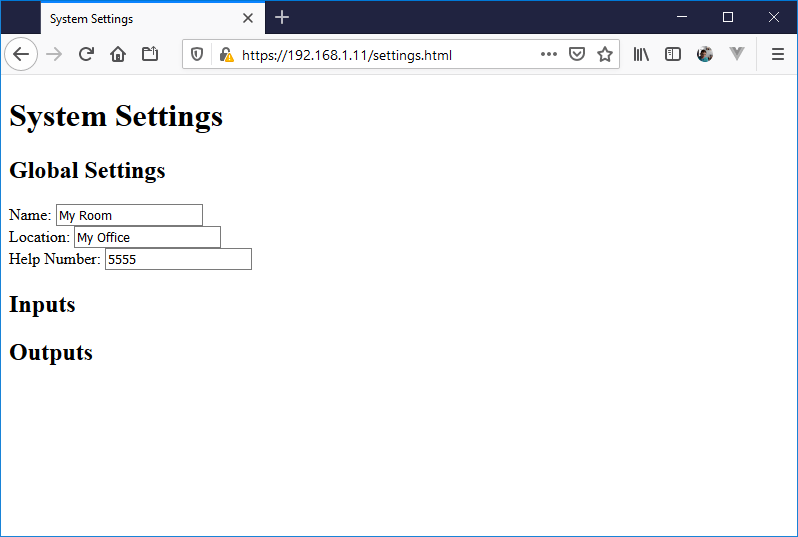
Unfortunately, because we’re using JavaScript to fetch the values from CWS, modern browsers will block this attempt unless it originates from the same IP address as your processor. So testing the HTML will have to be done by loading these files to your processor. If we had more control over the web server running on the Crestron processor, we could make our API easily accessible to other devices.
Update app.js so we can populate the inputs as well:
const nameInput = document.getElementById('name');
const locationInput = document.getElementById('location');
const helpNumberInput = document.getElementById('helpNumber');

const inputs = document.getElementById('inputs');

async function getSettings () {
    let result = await fetch('/cws/api/room');
    let data = await result.json();

    nameInput.value = data.name;
    locationInput.value = data.location;
    helpNumberInput.value = data.helpNumber;

    let i = 1;

    data.inputs.forEach((item) => {
        let div = document.createElement('div');

        let label = document.createElement('label');
        label.setAttribute('for', `input-${i}`);
        label.innerText = `Input ${i}`;
        div.appendChild(label);

        div.appendChild(document.createTextNode(' '));

        let textField = document.createElement('input');
        textField.setAttribute('type', 'text');
        textField.setAttribute('id', `input=${i}`);
        textField.setAttribute('value', item);
        div.appendChild(textField);

        inputs.appendChild(div);
        i += 1;
    });
}

setTimeout(getSettings, 500);
We’re using JavaScript to build out the number of text fields to match how many inputs we have in our API results. We create a text input and label for each one, then add them all to the Inputs container on our page. Let’s do the same thing for outputs:
const nameInput = document.getElementById('name');
const locationInput = document.getElementById('location');
const helpNumberInput = document.getElementById('helpNumber');

const inputs = document.getElementById('inputs');
const outputs = document.getElementById('outputs');

async function getSettings () {
    let result = await fetch('/cws/api/room');
    let data = await result.json();

    nameInput.value = data.name;
    locationInput.value = data.location;
    helpNumberInput.value = data.helpNumber;

    let i = 1;

    data.inputs.forEach((item) => {
        let div = document.createElement('div');

        let label = document.createElement('label');
        label.setAttribute('for', `input-${i}`);
        label.innerText = `Input ${i}`;
        div.appendChild(label);

        div.appendChild(document.createTextNode(' '));

        let textField = document.createElement('input');
        textField.setAttribute('type', 'text');
        textField.setAttribute('id', `input-${i}`);
        textField.setAttribute('value', item);
        div.appendChild(textField);

        inputs.appendChild(div);
        i += 1;
    });

    i = 1;

    data.outputs.forEach((item) => {
        let div = document.createElement('div');

        let label = document.createElement('label');
        label.setAttribute('for', `output-${i}`);
        label.innerText = `Output ${i}`;
        div.appendChild(label);

        div.appendChild(document.createTextNode(' '));

        let textField = document.createElement('input');
        textField.setAttribute('type', 'text');
        textField.setAttribute('id', `output-${i}`);
        textField.setAttribute('value', item);
        div.appendChild(textField);

        outputs.appendChild(div);
        i += 1;
    });
}

setTimeout(getSettings, 500);
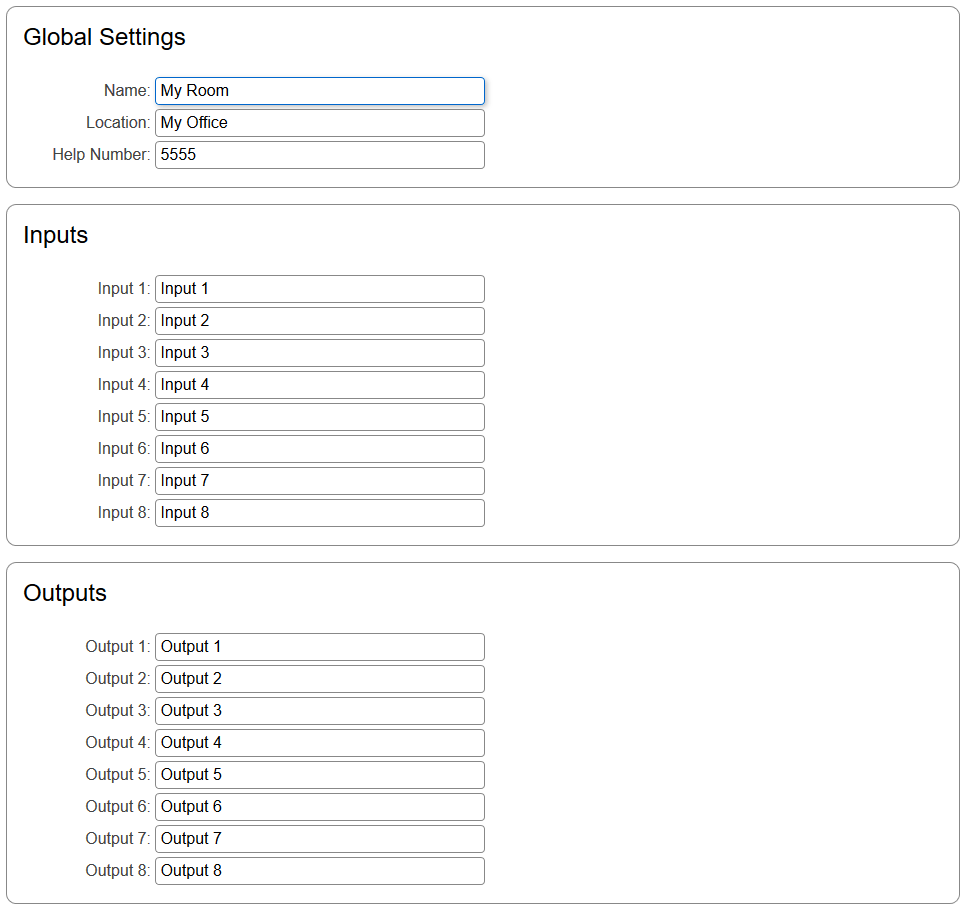
Now when you load up the /settings.html page, you get a very 90’s-ish web layout showing all of our system configuration:

Styling
Before we add much more to the API, lets give our page a bit better style. Add a reference to our stylesheet in settings.html:
<!DOCTYPE html>
<html lang="en">
<head>
    <meta charset="UTF-8">
    <meta http-equiv="X-UA-Compatible" content="IE=edge">
    <meta name="viewport" content="width=device-width, initial-scale=1.0">
    <link rel="stylesheet" href="style.css">
    <title>System Settings</title>
</head>
<body>
Now create style.css in the same folder as settings.html:
body {
    font: normal 12pt sans-serif;
}

h1,
h2 {
    font-weight: normal;
}

label {
    display: inline-block;
    width: 8em;
    line-height: 2em;
    color: #444;
    text-align: right;
}

input[type=text] {
    margin-left: 1em;
    padding: 0.25em;
    border: solid 1px #888;
    border-radius: 4px;
    font: inherit;
    width: 20em;
}

input[type=text]:focus {
    outline: none;
    border: solid 1px #0066cc;
    box-shadow: 2px 2px 5px rgba(0, 0, 0, 0.25);
}

.group {
    margin: 1em 2em;
    padding: 1em;
    border: solid 1px #888;
    border-radius: 10px;
    max-width: 920px;
}

.group h2 {
    margin: 0 0 1em 0;
}
OK, that looks a bit more modern:
What’s Next
I think this is a good spot to take a break before diving into the last topic which will be how to apply updates to our system settings. We’ll handle PUT requests that can be used to update the state in our SystemSettings class. We’ll follow the same format as we did in this post: handle new API requests, provide a frontend interface to it, then style it a little better.
If you’d like to grab a copy of this program, it’s available on GitHub. Thanks for reading!
