I’m traveling for work for two weeks, so I won’t have access to my normal equipment while I’m gone. It’s probably a good time to update on my previous post about setting up a VC-4 instance using a virtual private server (VPS).
Build the Server
Last time, I setup a new VPS using Linode, and even though they’ve since been acquired by Akamai, I’ll use them again for this demo.
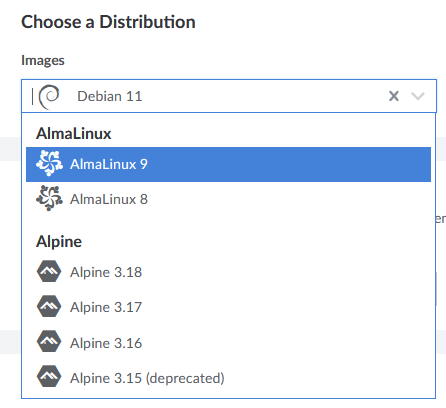
I used Rocky Linux previously, but now we’ll switch to AlmaLinux 9 since that seems to be the best choice (besides RHEL):
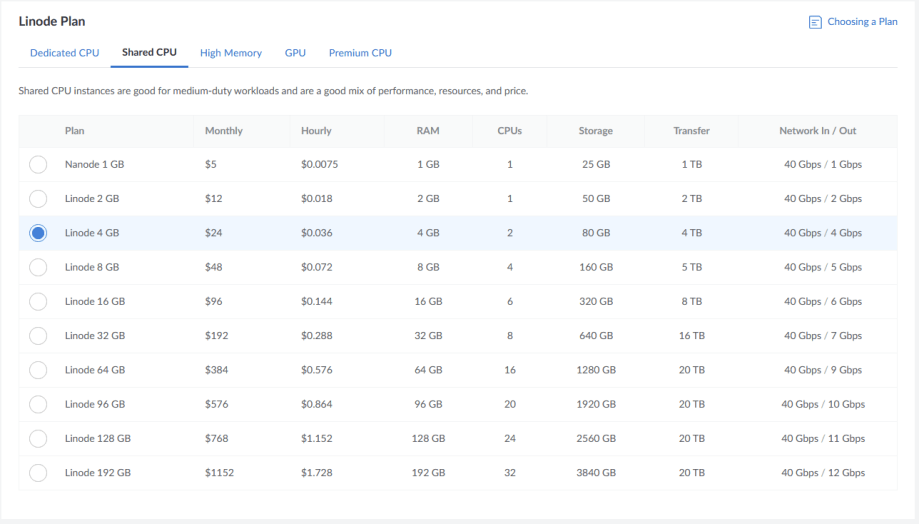
I’m not going to run this server for very long, just while I’m traveling. I want to make sure it has enough memory (4GB) and at least 2 CPUs. Shared CPUs are a cheaper option:
After setting a strong enough password, we’re able to boot into our new server using the web console!

I’m not going to go over creating a new user and starting an SSH server, those were covered last time.
VC-4
Next step is to download the latest version of the VC-4 software (currently 4.0003.00016 as of writing this). Copy it over to your new server and unzip it. You’ll see these files in the vc4 directory:
$ ls -l
total 12
drwxrwxr-x. 2 kiel kiel 4096 Oct 11 10:05 el8
drwxrwxr-x. 2 kiel kiel 4096 Oct 11 10:05 el9
-rwxrwxr-x. 1 kiel kiel  570 Jun  1 01:44 installVC4.sh
$
Run the installVC4.sh script and watch it install 1,000 packages. You’ll have to answer some questions towards the end of the script. Now you have a VC-4 instance, completely open to the Internet!
We should make sure to install mod_ssl so Apache will also serve files over HTTPS:
$ sudo dnf install mod_sslAnd mod_authnz_pam so Apache can tie into PAM for authentication:
$ sudo dnf install mod_authnz_pamLet’s Encrypt!
Getting a free TLS certificate means there’s no excuse to leave your server unencrypted. There are self-signed certificates installed by default, but it’s so easy to grab a trusted cert these days you might as well.
$ sudo dnf install certbotYou can visit the Certbot website to quickly learn how to use it.
Cockpit
The VC-4-PC-3 computers come with Cockpit installed and I find it’s easier to configure some things this way than remembering the differences in config files. And why not give ourselves access to the same tools Crestron has in their setup? We can add it to our server with a simple:
$ sudo dnf install cockpitIt won’t start by default, you’ll have to run:
$ sudo systemctl enable --now cockpit.socketHardening VC-4
Crestron provides step-by-step instructions to require a username and password before someone can access the settings pages in VC-4. We’ve already handled installing the software, now we need to edit a couple of files.
Edit /etc/httpd/conf.modules.d/55-authnz_pam.conf and uncomment the single line to enable loading the module:
LoadModule authnz_pam_module modules/mod_authnz_pam.so
Create a new file /etc/pam.d/httpd-auth and add these lines to it:
auth     required  pam_listfile.so item=user sense=deny file=/etc/httpd/conf.d/denyusers onerr=succeed
auth     include   system-auth
account  include   system-auth
If SELinux is enabled, we also need to give httpd permission to access PAM:
$ sudo setsebool -P httpd_mod_auth_pam 1Now for a questionable step, but it does seem necessary. Run these commands to give Apache access to /etc/shadow:
$ sudo chgrp apache /etc/shadow
$ sudo chmod 440 /etc/shadow
Lets pause for a second because this immediately feels wrong; giving access to one of the more secretive files in Linux to a complex HTTP server seems like a recipe for disaster. If I was going to dig into this further, I’d look at other authentication mechanisms.
I’ll be honest: I haven’t used Apache much since I stopped writing PHP. This may be a perfectly safe configuration to make. I skipped over it on my first pass-thru of the Crestron docs to see if it was necessary, and it seems that it is.
Now we need to add a couple sections to /etc/httpd/conf.modules.d/crestron.conf:
# actually generate an HTTP error, instead of truncating
SecRequestBodyLimitAction Reject

<Location "${CRESTRON_VC_4_WEBROOT}/config/settings/WebApi/">
        SSLRequireSSL
        AuthType Basic
        AuthName "PAM Authentication"
        AuthBasicProvider PAM
        AuthPAMService httpd-auth
        Require valid-user
</Location>

<Location "${CRESTRON_VC_4_WEBROOT}/config/status/WebApi/">
        SSLRequireSSL
        AuthType Basic
        AuthName "PAM Authentication"
        AuthBasicProvider PAM
        AuthPAMService httpd-auth
        Require valid-user
</Location>

# Settings api redirect
<Location "${CRESTRON_VC_4_WEBROOT}/config/settings/WebApi/">
After you save your changes, restart Apache with:
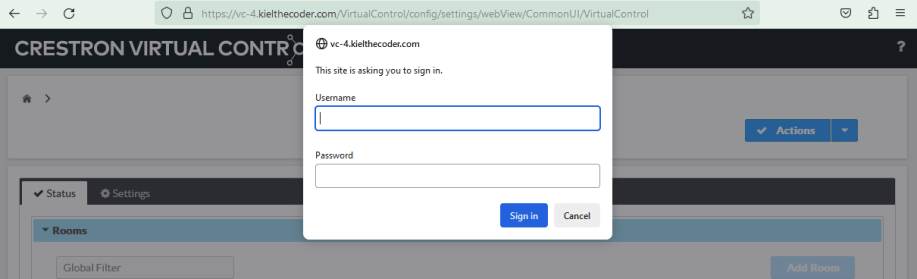
$ sudo systemctl restart httpdNow when you try to access VC-4 over HTTPS you’ll be prompted to login first:
Now we have a VC-4 instance we can reach from anywhere and it only allows authenticated users to play around on it.
That was a lot of work!
This may have only taken 5 minutes to read, but it took about an hour to create. I don’t want to waste an hour every time I build a VC-4 server!
The cool thing about virtual servers is they lend themselves to quickly cloning new virtual servers. Linode has a feature where you can create an “image” of an existing VPS, then you can use that image as the basis for future servers:

Or if you’re using another VM software, you could take a snapshot at this point so you can quickly spin out a new server from that. Either way, why do all this hard work again when you’ve got programs to write!
Thanks for reading!

if u copy a instance vc4, test license will quickly unuse .
LikeLike
You should purchase a license!
LikeLike