The Contract Editor is a tool released by Crestron to put an end to arbitrary join numbers. Of course, there’s NO documentation, so figuring it out is left up to us!
It’s a good idea: what meaning does join 253 hold to a JavaScript or C# programmer? What if that join had a name like General.Room.Power_On_Fb? The purpose of what the code does is now obvious because we’re naming the messages we pass between UI and program.
I’m going to admit something. I tried Contract Editor when it was first released. I tried it again after Crestron Masters 2021. Both times left me frustrated. I fully expect this will be the third (and final) time I try Contract Editor. With that disclaimer out of the way, let’s try to get through this as painlessly as possible.
The Least Painful Walkthrough of Contract Editor I Can Muster
We’re going to build a simple contract so we can see how it gets used. Install Contract Editor then open it.
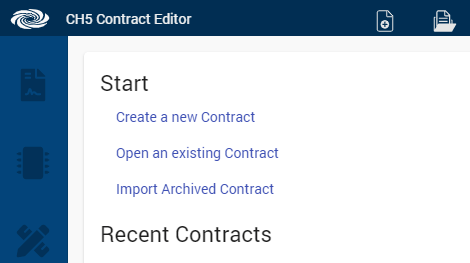
The first page has a few options listed under the Start heading. We want to Create a new Contract.

The New Contract dialog is displayed. Since we haven’t picked an actual room type yet, I’m going to name it General. I’m also going to create a folder named contracts in our repo folder and save it there. When everything looks good, hit Create.
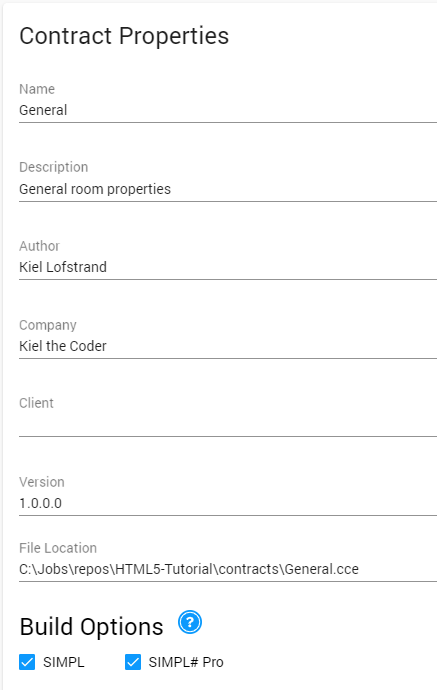
Just fill in whatever you like for the Contract Properties. I’m not sure if these are actually visible anywhere else. At the bottom, leave Build Options with both SIMPL and SIMPL# Pro checked so we can examine both.
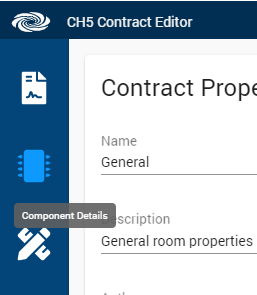
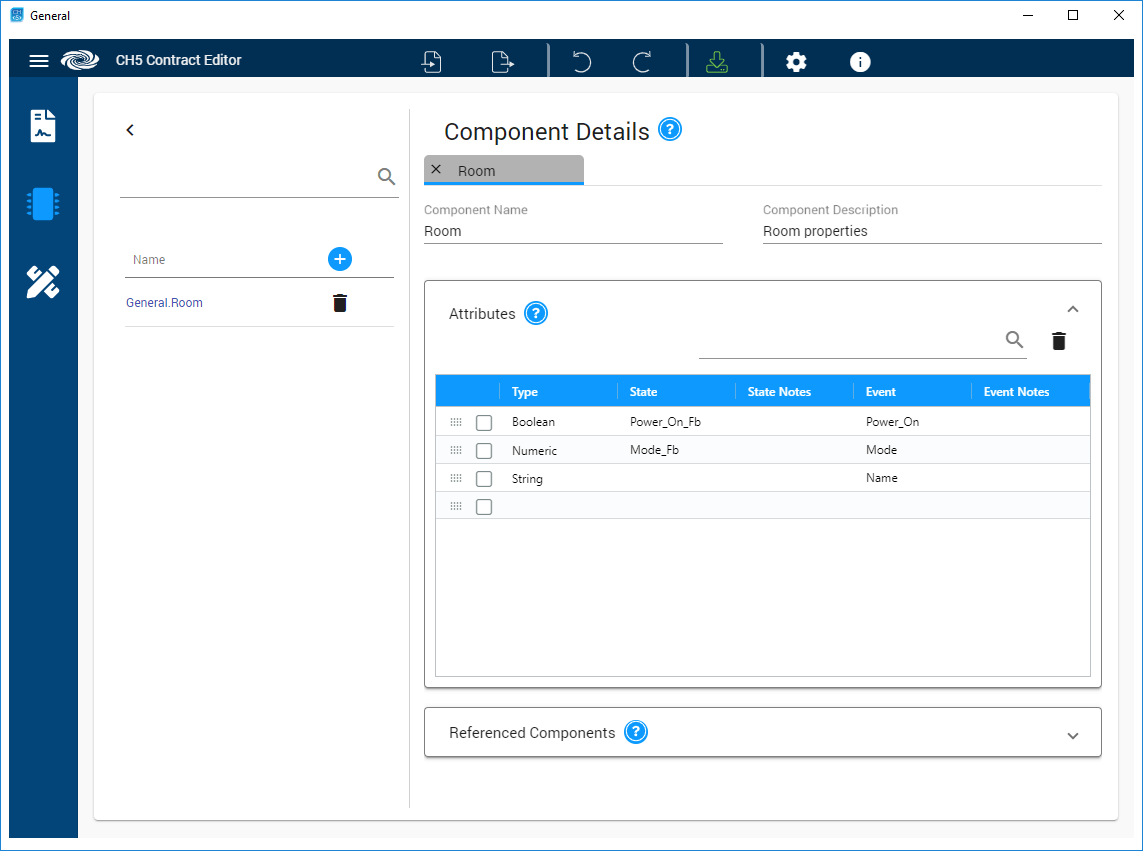
Next, we’re going to visit Component Details (the second docked icon that looks like a logic chip).

In the list, click the blue + icon to add a new component. For Component Name, enter Room. You can also enter Room properties as the Component Description.
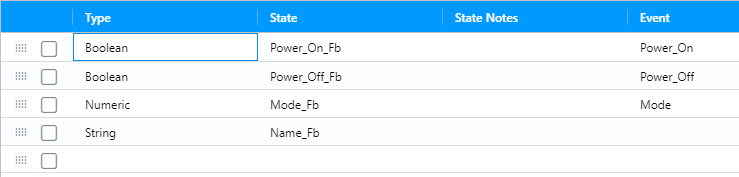
We’re going to add 4 attributes to this component:
| Type | State | Event | |
| 1 | Boolean | Power_On_Fb | Power_On |
| 2 | Boolean | Power_Off_Fb | Power_Off |
| 3 | Numeric | Mode_Fb | Mode |
| 4 | String | Name_Fb |
State represents the left-side of a symbol in SIMPL Windows. For example, if we wanted button feedback or a page flip.
Event represents the right-side of a symbol in SIMPL Windows. For example, a button press.
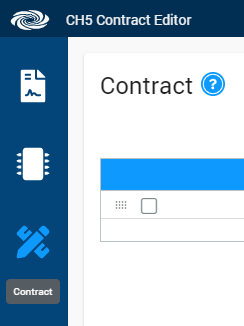
Next, we need to go to the Contract page to assign components to this contract.
If you double-click the column under Component Name, you can select General.Room. I’m just going to leave the Instance Name as Room.

Lastly, select Build Contract from the top menu. And that’s it for our contract!
The output files will be saved into contracts/output/. Since I don’t want these included in our source repository, I’ll add this path to a new .gitignore file in the root folder of our repo:
contracts/output/
Usually when I add some new stuff to .gitignore, I check it in with a commit message saying why I’m ignoring something.
If you open up the actual General.cce file in VS Code, it’s a fairly readable JSON file. I wouldn’t advise writing it by hand though.
Lets explore the generated output files.
SIMPL Windows
We’ll start with the “easy” one: SIMPL Windows. Create a new SIMPL program and save it into simpl/HTML5 Demo CP4.smw. I plan to use a CP4 for testing, but you can use any processor you like for now (even a 3-series). Add a TS-770 symbol to IP ID 03 then switch to Program view (the bug on the toolbar).
Next, go to the Project > Manage GUI Extenders menu. We’re going to add the generated contract to the touchpanel symbol:
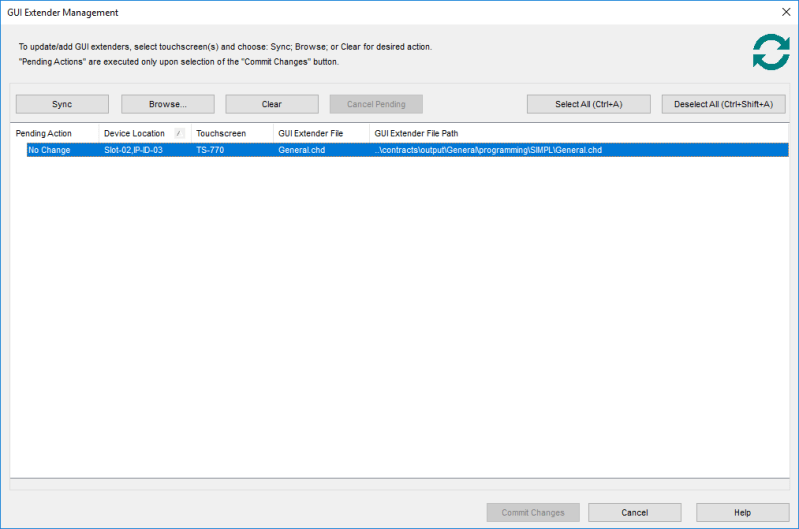
Select the touchpanel in the list and hit Browse. Add contracts/output/General/programming/SIMPL/General.chd. Phew! Hit Commit Changes and you’ll see that the TS-770 symbol now has a Room component attached to it:

If you check the different signal types, you’ll see we have several inputs and outputs to the touchpanel. Think of an output as something generated by the panel and an input as something we send to it. Power_On, Power_Off, and Mode are all outputs we can respond to. Power_On_Fb, Power_Off_Fb, Mode_Fb, and Name_Fb are all inputs we can use to affect something on the touchpanel.
Still with me?
Let’s create a quick program to test that our contract is working correctly:

Right-click on the TS-770 symbol in Program View and select Insert Device Extender > Ethernet Offline Manager.
Add a NOT and a Serial Send symbol to the program.
Wire them together so that when the panel comes online, we send a string to Name_Fb on our Room component.

Add a Set/Reset Latch to the program.
Wire the Power_On, Power_Off and feedback signals to be driven by the latch.
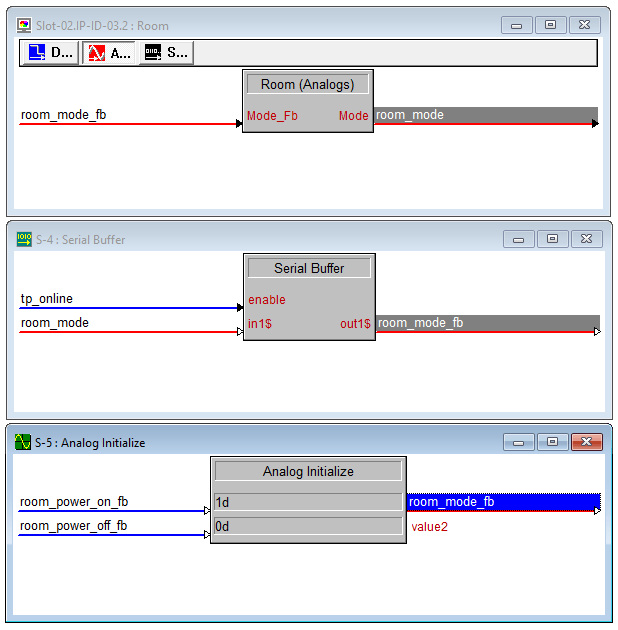
Add a Serial Buffer and an Analog Initialize to the program.
Wire Mode and Mode_Fb to the serial buffer. We aren’t validating which mode the UI selects, but we make sure to update the feedback to the touchpanel.
We’ll also set the mode to 1 (i.e.: user mode) when the power turns on, and 0 (i.e.: no mode) when the power turns off.
That’s it! Compile this program and load it to your controller. Now do some housekeeping with git and make sure everything you want committed is and everything you want ignored is. I recommend adding the following to .gitignore:
contracts/output/

# SIMPL Windows
SPlsWork/
*.ASV
*.chd?
*.lpz
*.hash
*.sig
*.sm2
*.smft
*.zip
An HTML5 Layout
OK, we’ve got our program loaded! But what about the HTML5 layout? Fire up VS Code and open our repo folder. The Contract Editor builds an HTML file for our reference. Open contracts/output/General/interface/HTML/Room.html. It looks like this:
<template id="General.Room.Room">
  <div id="Room.Room">
    <ch5-button sendEventOnClick="Room.Power_On" receiveStateSelected="Room.Power_On_Fb">
    </ch5-button>
    <ch5-button sendEventOnClick="Room.Power_Off" receiveStateSelected="Room.Power_Off_Fb">
    </ch5-button>
    <ch5-slider sendEventOnChange="Room.Mode" receiveStateValue="Room.Mode_Fb">
    </ch5-slider>
	<span data-ch5-textcontent="Room.Name_Fb">Label</span>
  </div>
</template>
Copy parts of the div into our index.html so that it looks like this:
<!DOCTYPE html>
<html lang="en">
<head>
  <meta charset="UTF-8">
  <meta http-equiv="X-UA-Compatible" content="IE=edge">
  <meta name="viewport" content="width=device-width, initial-scale=1.0">
  <title>Document</title>
  <link rel="stylesheet" href="style.css">
</head>
<body>
  <div class="content">
    <h1 data-ch5-textcontent="Room.Name_Fb">Room Name</h1>
    <div class="btn-group">
      <ch5-button label="Power On" sendEventOnClick="Room.Power_On" receiveStateSelected="Room.Power_On_Fb">
      </ch5-button>
      <ch5-button label="Power Off" sendEventOnClick="Room.Power_Off" receiveStateSelected="Room.Power_Off_Fb">
      </ch5-button>
    </div>
  </div>
  <script src="bundle.js"></script>
</body>
</html>
I’ve moved the JavaScript into the page body and have renamed it to bundle.js. You’ll see why in just a moment. We’re also going to update style.css:
@import url('https://fonts.googleapis.com/css2?family=Muli:wght@400;700&display=swap');

* {
  box-sizing: border-box;
  margin: 0;
}

body {
  display: flex;
  flex-direction: column;
  align-items: center;
  justify-content: center;
  height: 100vh;
  width: 100vw;
  overflow: hidden;
  background: white;
  color: black;
}

h1 {
  font-family: 'Muli', sans-serif;
  font-size: 4rem;
  margin: 1rem;
  text-align: center;
}

.btn-group {
  display: flex;
  flex-direction: row;
}

.ch5-button .cb-btn {
  background: linear-gradient(#4488ff, #2244ee);
  border: solid 2px #002288;
  color: #fafafa;
  border-radius: 1.5rem;
  padding: 2rem;
  margin: 0.5rem;
  font-size: 2rem;
}

.ch5-button--selected .cb-btn {
  background: linear-gradient(180deg, #cc6600, #ff8800);
  border: solid 2px #111111;
  color: #111111;
  outline: none;
}
Some of these class names are important because the CH5 components add and remove them based on their feedback (such as ch5-button--selected).
Now for my least favorite part of modern web development… npm. In a Terminal window, type:
> npm initYou can accept most of the defaults. Our project has some dependencies that can only be satisfied by installing a bunch of Node packages!
> npm install @crestron/ch5-crcomlibBefore we get side-tracked, lets update .gitignore (VS Code pops up a recommendation to do this anyway):
contracts/output/

# HTML5
node_modules/

# SIMPL Windows
SPlsWork/
*.ASV
*.chd?
*.lpz
*.hash
*.sig
*.sm2
*.smft
*.zip
Go ahead and commit your recent changes to git. Next, we’re going to replace app.js with this:
import {
    publishEvent,
    subscribeState,
    bridgeReceiveIntegerFromNative,
    bridgeReceiveBooleanFromNative,
    bridgeReceiveStringFromNative,
    bridgeReceiveObjectFromNative
} from '@crestron/ch5-crcomlib/build_bundles/cjs/cr-com-lib';

window.bridgeReceiveIntegerFromNative = bridgeReceiveIntegerFromNative;
window.bridgeReceiveBooleanFromNative = bridgeReceiveBooleanFromNative;
window.bridgeReceiveStringFromNative = bridgeReceiveStringFromNative;
window.bridgeReceiveObjectFromNative = bridgeReceiveObjectFromNative;
This pulls in just enough of the CH5 cr-com-lib to do what we need. It also makes sure that necessary functions are bound to the global namespace (window).
Webpack
I promise, after my previous foray into Webpack, I want to keep this as simple as possible. In a Terminal window, type:
> npm install --save-dev webpack webpack-cli webpack-dev-serverCreate webpack.config.js in the root directory of our repo:
const path = require('path');

module.exports = {
    mode: 'development',
    entry: './src/app.js',
    devServer: {
        contentBase: './dist'
    },
    output: {
        filename: 'bundle.js',
        path: path.resolve(__dirname, 'dist')
    }
}
See bundle.js there? That’s going to contain our bundled JavaScript libraries so index.html can include them. OK, we should be ready for Webpack to do its thing. In Terminal, type:
> npx webpackThis will build dist/bundle.js. Open it if you like and pass out from reading all the obfuscated JavaScript. Now would be a good time to update .gitignore again:
contracts/output/

# HTML5
node_modules/
dist/

# SIMPL Windows
SPlsWork/
*.ASV
*.chd?
*.lpz
*.hash
*.sig
*.sm2
*.smft
*.zip
The dist folder is where we’re going to stage our files for archiving the HTML5 project. For now, manually copy index.html and style.css from the src folder into dist. We’ll make this Webpack’s job later on.
In Terminal, we’re going to use this command to archive our project along with the contract we generated:
> ch5-cli archive -p project -d dist -o archive -c contracts\output\General\interface\mapping\General.cse2jThis will put everything into archive/project.ch5z which we can send to our touchpanel. I’m just going to use Toolbox for now to send the project to a TS-770 and check that it works:

You can also open SIMPL debugger to make sure button states really change and send different text to the touchpanel. Again, good time to update .gitignore and commit:
contracts/output/

# HTML5
node_modules/
dist/
archive/

# SIMPL Windows
SPlsWork/
*.ASV
*.chd?
*.lpz
*.hash
*.sig
*.sm2
*.smft
*.zip
SIMPL# Pro
We’ve seen it work with SIMPL, so getting it to work with SIMPL# Pro shouldn’t be too difficult. First, lets take a look at the files that Contract Editor generated. In this case, we have a series of classes saved in contracts/output/General/programming/SIMPLSharp/General:
ComponentMediator.g.cs
Contract.g.cs
Room.g.cs
UIEventArgs.g.cs
If we explore Room.g.cs, we see the same interface we created in Contract Editor:
namespace General
{
    public interface IRoom
    {
        object UserObject { get; set; }

        event EventHandler<UIEventArgs> Power_On;
        event EventHandler<UIEventArgs> Power_Off;
        event EventHandler<UIEventArgs> Mode;

        void Power_On_Fb(RoomBoolInputSigDelegate callback);
        void Power_Off_Fb(RoomBoolInputSigDelegate callback);
        void Mode_Fb(RoomUShortInputSigDelegate callback);
        void Name_Fb(RoomStringInputSigDelegate callback);
    }
I don’t like programming C# in VS Code, so I’m going to open VS 2019 for this next part. Lets Create a new project then Class Library (.NET Framework). I’m going to save this inside our repo folder under simplsharp:

If you need more help getting started with SIMPL# Pro, I recommend following my primer first. Add the Crestron.SimplSharp.SDK.Program NuGet package to your project. Remove the Class1.cs file since the project now contains ControlSystem.cs. Lets strip ControlSystem.cs down to just the essentials:
using System;
using Crestron.SimplSharp;
using Crestron.SimplSharpPro;
using Crestron.SimplSharpPro.CrestronThread;

namespace HTML5Demo
{
    public class ControlSystem : CrestronControlSystem
    {
        public ControlSystem()
            : base()
        {
            try
            {
                Thread.MaxNumberOfUserThreads = 20;
            }
            catch (Exception e)
            {
                ErrorLog.Error("Error in ControlSystem: {0}", e.Message);
            }
        }

        public override void InitializeSystem()
        {
            try
            {
                CrestronConsole.PrintLine("TODO: everything!");
            }
            catch (Exception e)
            {
                ErrorLog.Error("Error in InitializeSystem: {0}", e.Message);
            }
        }
    }
}
Build the solution. You’ll want to update .gitignore then commit everything:
contracts/output/

# HTML5
node_modules/
dist/
archive/

# SIMPL Windows
SPlsWork/
*.ASV
*.chd?
*.lpz
*.hash
*.sig
*.sm2
*.smft
*.zip

# SIMPL# Pro
.vs/
bin/
obj/
packages/
I’m going to go quick on this one because this post is getting quite long (and Firefox is struggling). Add the TS-770 to the program:
using System;
using Crestron.SimplSharp;
using Crestron.SimplSharpPro;
using Crestron.SimplSharpPro.CrestronThread;
using Crestron.SimplSharpPro.DeviceSupport;
using Crestron.SimplSharpPro.UI;

namespace HTML5Demo
{
    public class ControlSystem : CrestronControlSystem
    {
        private BasicTriListWithSmartObject _tp;

        public ControlSystem()
            : base()
        {
            try
            {
                Thread.MaxNumberOfUserThreads = 20;
            }
            catch (Exception e)
            {
                ErrorLog.Error("Error in ControlSystem: {0}", e.Message);
            }
        }

        public override void InitializeSystem()
        {
            try
            {
                _tp = new Ts770(0x03, this);

                if (_tp.Register() != eDeviceRegistrationUnRegistrationResponse.Success)
                {
                    ErrorLog.Error("Unable to register TS-770: {0}", _tp.RegistrationFailureReason);
                }
            }
            catch (Exception e)
            {
                ErrorLog.Error("Error in InitializeSystem: {0}", e.Message);
            }
        }
    }
}
Right-click on our project in Solution Explorer and add a new folder named contracts.

Now add all the generated contract classes into it.
These classes live in a different namespace, General in our case. Remember, this is what we named our contract in the editor?
Update ControlSystem.cs to use our contract:
using System;
using Crestron.SimplSharp;
using Crestron.SimplSharpPro;
using Crestron.SimplSharpPro.CrestronThread;
using Crestron.SimplSharpPro.DeviceSupport;
using Crestron.SimplSharpPro.UI;
using General;

namespace HTML5Demo
{
    public class ControlSystem : CrestronControlSystem
    {
        private Contract _contract;
        private BasicTriListWithSmartObject _tp;

        public ControlSystem()
            : base()
        {
            try
            {
                Thread.MaxNumberOfUserThreads = 20;
            }
            catch (Exception e)
            {
                ErrorLog.Error("Error in ControlSystem: {0}", e.Message);
            }
        }

        public override void InitializeSystem()
        {
            try
            {
                _contract = new Contract();

                _contract.Room.Power_On += Room_Power_On;
                _contract.Room.Power_Off += Room_Power_Off;

                _tp = new Ts770(0x03, this);
                _tp.OnlineStatusChange += tp_OnlineStatusChange;

                _contract.AddDevice(_tp);

                if (_tp.Register() != eDeviceRegistrationUnRegistrationResponse.Success)
                {
                    ErrorLog.Error("Unable to register TS-770: {0}", _tp.RegistrationFailureReason);
                }
            }
            catch (Exception e)
            {
                ErrorLog.Error("Error in InitializeSystem: {0}", e.Message);
            }
        }

        private void tp_OnlineStatusChange(GenericBase dev, OnlineOfflineEventArgs args)
        {
            _contract.Room.Name_Fb((StringInputSig sig, IRoom room) => sig.StringValue = "SIMPL# Pro Lab");
            _contract.Room.Power_On_Fb((BoolInputSig sig, IRoom room) => sig.BoolValue = false);
            _contract.Room.Power_Off_Fb((BoolInputSig sig, IRoom room) => sig.BoolValue = true);
        }

        private void Room_Power_On(object sender, UIEventArgs e)
        {
            if (e.SigArgs.Sig.BoolValue)
            {
                _contract.Room.Power_Off_Fb((BoolInputSig sig, IRoom room) => sig.BoolValue = false);
                _contract.Room.Power_On_Fb((BoolInputSig sig, IRoom room) => sig.BoolValue = true);
            }
        }

        private void Room_Power_Off(object sender, UIEventArgs e)
        {
            if (e.SigArgs.Sig.BoolValue)
            {
                _contract.Room.Power_On_Fb((BoolInputSig sig, IRoom room) => sig.BoolValue = false);
                _contract.Room.Power_Off_Fb((BoolInputSig sig, IRoom room) => sig.BoolValue = true);
            }
        }
    }
}
I really wish I could find documentation on how to use the Contract Editor with SIMPL#, so this is my best guess.
On line 33, we instantiate a new Contract. We register event handlers for Power_On and Power_Off. Any devices that use this contract will trigger these events. I’m using these events to interlock the Power On/Off buttons on our layout.
On lines 54-77, we send feedback through the contract. We call Name_Fb with a delegate that accepts StringInputSig and IRoom arguments. The contract will apply this delegate to each device in its list. I’m confused if this is the correct usage, but it seems like the delegate’s lifecycle ends when the call to Name_Fb returns.
And there you have it!

Summary
Wow, that took some effort! I really thought we’d get halfway through this topic and I’d want to give up. Here’s a summary of everything we did in this post:
- Created a new contract using Contract Editor
- Built contracts for SIMPL Windows and SIMPL# Pro
- Learned how to bundle the contract map (General.cse2j) into our HTML5 project
- Saw how to import and use the contract in SIMPL Windows
- Saw how to use the Contract class in SIMPL# Pro and add our devices to it
And after all that… I’m not going to use the Contract Editor again in this series of posts.
Where the Contract Editor Fits
The Contract Editor is a tool designed to be used by a team. It lays down the blueprint for how the user interface (front-end) interacts with the control system programming (back-end). In this tutorial, we’re handling both of those roles. If you had a project where separate developers handle those duties, there is value in imposing a contract between the two.
Also, if you’re programming in SIMPL Windows, having GUI Extenders makes it easier to segment your programming. You don’t have to remember which cluster of join numbers are reserved for Phone Dialing, you would instead expand the Phone Dialer component on the touchpanel symbol.
I see some value in the way it’s handled in SIMPL#, but I think there are easier ways we can map events and feedback across a collection of touchpanel devices. And since my goal in this series is to stick to SIMPL#, we’ll explore those methods in another post.
So if you find value in the Contract Editor, I think it has its place, and you aren’t creating more or less work by using it. And if you’re part of a large team, it may be the best way to ensure that front-end and back-end mesh up.
Next Time
In the next post, we’re going to play with the HTML5 XPanel! So, if you don’t have a physical touchpanel to test with, you’re in luck! I plan to stick with XPanel for the remainder of the posts, so they should be a bit more accessible from here on out.
As always, source code is available on GitHub. Thanks for reading!

Hi !
Many thanks for your article :), very interesting.
LikeLike
When you say “replace app.js with this:” do you mean change the entire contents of bundle.js (your instructions say to rename app.js)?
LikeLike
Does your src/app.js look like mine? https://github.com/kielthecoder/HTML5-Tutorial/blob/6f17e008d588c023e5f9563ee14eaf98d971e37c/src/app.js
LikeLike
Error: File dist/index.html has not been found.I can put it there manually, but am I missing something?
LikeLike
Never mind
LikeLike