Crestron MC3 Tear-down

Saw another wave of failed MC3 processors while browsing the Crestron forums so I decided I’d better make a backup of my SD card while I still could.

To get the cover off, I had to remove all visible screws from the outside (including the grounding screw). There’s also a lock nut on the RF antenna that had to be removed. The whole board slides out from the rear of the unit.

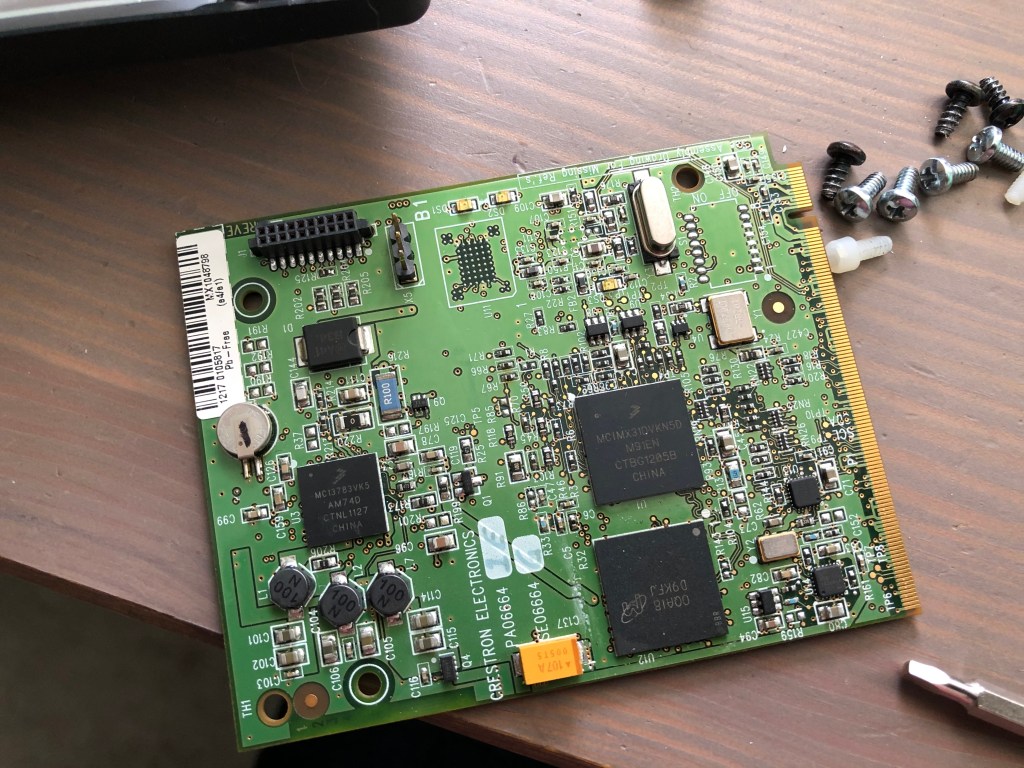
Once out of the chassis, there are two plastic screws holding a daughter board down. I removed those, then pulled the daughter board out. This exposes the SD card below. I had to slide the SD card to the right to unlock the socket, then I could remove it.

Daughter board removed to expose SD card slot

Using Ubuntu, I made a copy of the SD card and compressed it for storage in my Dropbox:

$ dd if=/dev/sde of=mc3-sd-card.img
$ bzip2 -v9 mc3-sd-card.img

Now I have a copy of the SD card saved, I wondered what was actually on it. First I tried fdisk to see what it reported:

$ fdisk -l mc3-sd-card.img
Disk mc3-sd-card.img: 1.9 GiB, 2027945984 bytes, 3960832 sectors
Units: sectors of 1 * 512 = 512 bytes
Sector size (logical/physical): 512 bytes / 512 bytes
I/O size (minimum/optimal): 512 bytes / 512 bytes

So fdisk didn’t detect any partition scheme. Maybe it’s just a FAT file system?

$ sudo mount -t vfat -o loop,ro mc3-sd-card.img /mnt
mount: /mnt: wrong fs type, bad option, bad superblock on /dev/loop6, missing codepage or helper program, or other error
$ sudo mount -t auto -o loop,ro mc3-sd-card.img /mnt
mount: /mnt: wrong fs type, bad option, bad superblock on /dev/loop6, missing codepage or helper program, or other error

What’s in this file? Using hexdump, I can page down and find messages about the Windows CE Ethernet Boot loader…

000219a0  31 39 3a 34 31 3a 33 33  00 00 00 00 4f 63 74 20  |19:41:33....Oct |
000219b0  20 37 20 32 30 31 35 00  57 69 6e 64 6f 77 73 20  | 7 2015.Windows |
000219c0  43 45 20 45 74 68 65 72  6e 65 74 20 42 6f 6f 74  |CE Ethernet Boot|
000219d0  6c 6f 61 64 65 72 20 25  64 2e 25 64 20 28 25 73  |loader %d.%d (%s|
000219e0  20 25 73 29 20 66 6f 72  20 43 72 65 73 74 72 6f  | %s) for Crestro|
000219f0  6e 0d 0a 00 50 52 4f 47  52 41 4d 20 52 45 51 20  |n...PROGRAM REQ |

I’m sure there is some information to be found reading Microsoft’s documentation. Maybe I’ll come back to this again someday?

SIMPL# Pro Primer: Part 4

Originally, I wanted to make Part 4 similar to the program in Part 3, just showing how to do it with a DMPS instead. But testing it means I have to get a DMPS setup in my lab and I don’t feel like doing that just yet. So instead, we’ll take a step back and look at how to gather information about the processor we’re running on.

Continue reading “SIMPL# Pro Primer: Part 4”

SIMPL# Pro Primer: Part 3 (continued)

We didn’t get very far in the last tutorial, but we did get all of our devices added successfully to the program. We’re going to continue using the same project and finish it by creating a user interface and adding some program logic.

Continue reading “SIMPL# Pro Primer: Part 3 (continued)”

SIMPL# Pro Primer: Part 3

By now you should be a pro at creating new SIMPL# Pro projects. Let’s create another one, but we’re going to set this one up slightly different this time. We’ll still call it Part3, but change the solution name to Primer:

Slight change in project creation, we’ll add everything to the Primer solution from now on
Continue reading “SIMPL# Pro Primer: Part 3”

SIMPL# Pro Primer: Part 1

In Part 1 of this primer, we’re going to look at how to create a new SIMPL# Pro project. This series assumes you have a copy of Visual Studio 2008 SP1 installed as well as the Crestron SIMPL# Plug-In. If you need to install the plug-in, it can be downloaded from Crestron. The current version is 2.000.0058.01.

Continue reading “SIMPL# Pro Primer: Part 1”

Tip: Write Modules

This tip is going to cover Crestron modules–specifically, writing your own.  As a new Crestron programmer, I shied away from doing this for years.  It wasn’t the style used by the other programmers I worked with, and I never felt that I had enough time between projects to revisit how I would have done it differently.  Over time, things change.  Our team of programmers changed, new styles replaced the old; I became more familiar with the tool set; I could turn around new work much quicker than when I started; and I found I finally had time to apply some retrospection.  Since I started incorporating my own modules into my programming, I’ve been able to increase my productivity even more and make the initial program almost bug-free.

Continue reading “Tip: Write Modules”

SIMPL+ Best Practice

I just finished watching the videos posted of Toine lecturing at Crestron Masters 2017.  Sadly, this was a session I really wanted to sit in, but the space was reserved for veteran programmers (and this was my first time attending Masters).

He has many good points about how SIMPL+ has many bottlenecks to understand and work with, but one of his talks at the end covered GatherAsync.  He prefaced this section by quickly covering what he considers the best practice for writing a CHANGE event in SIMPL+.

Here’s an example showing the design pattern:

THREADSAFE CHANGE From_Device
{
    String Temp[MAX_LINE_LENGTH];

    While (1)
    {
        Temp = Gather("\r", From_Device);
        MakeString(To_Device, "RX: %s", Temp);
    }
}

This pattern works for 2-series and 3-series processors.  Toine even says he can’t think of a better way to process incoming data from a device.

Normally, SIMPL+ operates at the lowest thread priority.  The Gather function, however, runs at a higher priority so it can quickly service data coming in from devices.  I wanted to pull this one idea out of his talk and put it into a blog post so I could easily remind myself that this is Crestron’s best practice.

What’s In a Name?

Crestron SIMPL Windows uses “named signals” to wire up programming logic.  These signals are referred to as digital (either high or low), analog (a 16-bit number), or serial (a string of characters).  Color is used to distinguish what type a signal is–blue for digital, red for analog, black for serial, green for ambiguous–but otherwise, your only clue about what information a signal carries is left up to its name.

How then should you name your signals?  Let’s look at a few examples and see why they are good choices for signal naming.

Continue reading “What’s In a Name?”