In the last post, we got started by making sure our tools worked and blinked some lights. In this post, we’ll dive deeper into how the NetLinx language works and write a legitimate program.
Other posts in this series:
- NetLinx: Getting Started
- NetLinx: Your First Program
- NetLinx: Testing
- NetLinx: SNAPI
- NetLinx: Modules
- NetLinx: A Real Program
D:P:S
NetLinx systems are organized by system number, the default being 1. Within a system, individual devices also have a unique number. Within each device, port numbers can be associated with different functions, inputs, outputs, whatever that device deals with. The way we reference devices in NetLinx is called D:P:S which stands for:
Device:Port:System
If you connect to a controller in NetLinx Studio, you can use the Online Tree to view available devices and their exposed ports:

Lets take a look at these two special devices: 0 and 5001.
Master Controller
The Master Controller is always device 0. Right now you can see that it contains 1 port, port 1. We can send strings and commands to the controller from our program by sending to this device. We could also communicate with masters in other systems by sending to those devices, say 0:1:2 to communicate with system 2.
I’m going to introduce the SEND_STRING statement to show how we can add debug messages to our program. The syntax looks like:
SEND_STRING DEV, '<string>'
Lets add this to our TIMELINE_EVENT:
TIMELINE_EVENT[TL_LOOP]
{
    [dvIO,1] = (TIMELINE.SEQUENCE == 1)
    [dvIO,2] = (TIMELINE.SEQUENCE == 2)
    [dvIO,3] = (TIMELINE.SEQUENCE == 3)
    [dvIO,4] = (TIMELINE.SEQUENCE == 4)
    [dvIO,5] = (TIMELINE.SEQUENCE == 5)
    [dvIO,6] = (TIMELINE.SEQUENCE == 6)
    [dvIO,7] = (TIMELINE.SEQUENCE == 7)
    [dvIO,8] = (TIMELINE.SEQUENCE == 8)

    IF (TIMELINE.SEQUENCE == 8)
    {
	    SEND_STRING 0:1:0, 'One more time!'
    }
}
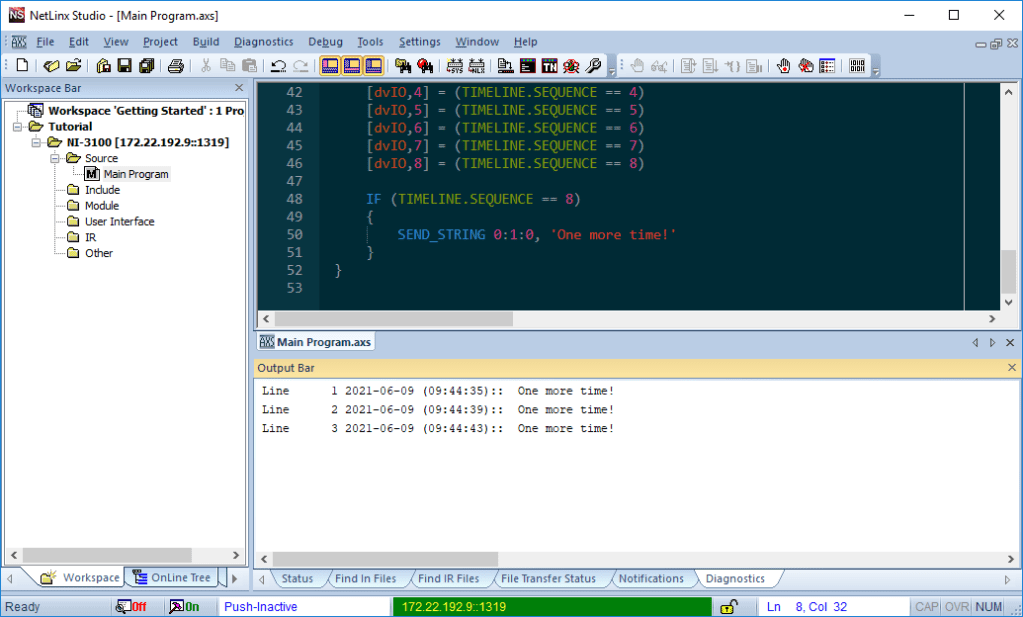
Go to Build > Build Active System to compile these changes. Now send the token file to your controller. After a minute, you’ll see the parade of lights again, but what about our message? It should be sending to the master each time we reach the end of our sequence. Where do we see that?
In the Output Bar at the bottom of NetLinx Studio, there should be a tab for Diagnostics. If you right-click in the blank area of this tab, you can select Enable Diagnostic Messages. After a few seconds, you should see our message print out:
We used device 0:1:0 to send strings to the console, but we can also give this special device a name. I like to name it dvCONSOLE, which we can add to the DEFINE_DEVICE section within our program:
PROGRAM_NAME='Main Program'

(***********************************************************)
(*          DEVICE NUMBER DEFINITIONS GO BELOW             *)
(***********************************************************)
DEFINE_DEVICE

dvCONSOLE = 0:1:0	// Master Controller

dvIO = 5001:17:0	// GPIO

(***********************************************************)
(*               CONSTANT DEFINITIONS GO BELOW             *)
(***********************************************************)
DEFINE_CONSTANT

TL_LOOP = 1

(***********************************************************)
(*               VARIABLE DEFINITIONS GO BELOW             *)
(***********************************************************)
DEFINE_VARIABLE

LONG lLoopTimes[] = { 500, 500, 500, 500, 500, 500, 500, 500 }

(***********************************************************)
(*                 STARTUP CODE GOES BELOW                 *)
(***********************************************************)
DEFINE_START

TIMELINE_CREATE(TL_LOOP, lLoopTimes, LENGTH_ARRAY(lLoopTimes),
    TIMELINE_RELATIVE, TIMELINE_REPEAT);

(***********************************************************)
(*                  THE EVENTS GO BELOW                    *)
(***********************************************************)
DEFINE_EVENT

TIMELINE_EVENT[TL_LOOP]
{
    [dvIO,1] = (TIMELINE.SEQUENCE == 1)
    [dvIO,2] = (TIMELINE.SEQUENCE == 2)
    [dvIO,3] = (TIMELINE.SEQUENCE == 3)
    [dvIO,4] = (TIMELINE.SEQUENCE == 4)
    [dvIO,5] = (TIMELINE.SEQUENCE == 5)
    [dvIO,6] = (TIMELINE.SEQUENCE == 6)
    [dvIO,7] = (TIMELINE.SEQUENCE == 7)
    [dvIO,8] = (TIMELINE.SEQUENCE == 8)

    IF (TIMELINE.SEQUENCE == 8)
    {
	    SEND_STRING dvCONSOLE, 'One more time!'
    }
}
This program behaves exactly the same, but now we can reference the master controller in our program using the dvCONSOLE variable. There may be times when it’s easier to print out a simple message or variable state rather than engaging the full debugger.
Device Controller
If you look at device 5001 in the Online Tree, you’ll notice it has many ports. This is the integrated device controller and is how the master interfaces with devices via RS-232, IR, relay, or I/O. The NetLinx box actually houses 2 devices that talk to each other over an Ethernet-like bus called ICS. In the NI series of controllers (such as the NI-2100 and NI-3100 I’m using), the assigned ports are different based on the hardware. For example, the I/O on the NI-2100 is port 9, but on the NI-3100 and NI-4100 is port 17. Thankfully, on the NX series of controllers, these port numbers were standardized across the different models. I/O is always on port 22 for NX controllers.
Unlike the master controller, the number for the device controller can be changed if desired. 5001 is the default and is typically left alone. Lets add a few more device definitions to our program:
DEFINE_DEVICE

dvCONSOLE = 0:1:0	// Master Controller

dvCOM1 = 5001:1:0	// RS-232 port 1
dvCOM2 = 5001:2:0	// RS-232 port 2

dvIR1 = 5001:9:0	// IR port 1
dvIR2 = 5001:10:0	// IR port 2

dvRELAY = 5001:8:0	// Relays
dvIO    = 5001:17:0	// GPIO
What about the relays and I/O? We have 8 relays we can control on the NI-3100 (and only 4 on the NI-2100), but we only have the one port for control (port 8)? How do we address each individual relay on this one port?
This is where we use different channels on a port to control different things. Each channel on the relay port maps to one relay. If we turn the channel on, the corresponding relay closes. If we turn the channel off, the relay opens. Channels work differently for other device ports. For example, channels on IR ports map to codes stored in an IR driver. Channel 9 is typically the POWER command, but it depends on how the IR driver was created.
We’ll explore channels in more depth when we get to talking about SNAPI (Standard NetLinx API) in a future post.
Lets add another device to our system!
Touchpanels
Touchpanels are separate, physical devices that talk over Ethernet to a controller.
My ancient (and heavy!) NXT-1200 automatically connects to the NI-2100 on my network switch. They’re both set for DHCP and there’s no firewall between them that might block traffic.
There are other options to specify how a touchpanel connects (such as URL) where you give it the exact IP address or hostname of the controller.
Auto typically Just WorksTM.
With our touchpanel connected to our controller, we’ll see it appear in the Online Tree in NetLinx Studio when we refresh:

By convention, touchpanels usually start in the 10000 range for device numbers. The first touchpanel is usually 10001, the second 10002, etc., but you can also set them to any number you like. Port numbers on touchpanels are defined in the layout file loaded to them, so we’ll look at those later. For now, lets add another device to our program:
DEFINE_DEVICE

dvCONSOLE = 0:1:0	// Master Controller

dvCOM1 = 5001:1:0	// RS-232 port 1
dvCOM2 = 5001:2:0	// RS-232 port 2

dvIR1 = 5001:9:0	// IR port 1
dvIR2 = 5001:10:0	// IR port 2

dvRELAY = 5001:8:0	// Relays
dvIO    = 5001:17:0	// GPIO

dvTP1 = 10001:1:0	// NXT-1200
We’ll add an event handler for when the touchpanel comes online. Devices aren’t immediately available when the program first starts up, so it’s good practice to wait until they register as online. DATA_EVENTs handle online/offline status:
DEFINE_EVENT

DATA_EVENT[dvTP1]
{
    ONLINE:
    {
	    SEND_COMMAND dvTP1, 'ADBEEP'
    }
}

TIMELINE_EVENT[TL_LOOP]
{
    [dvIO,1] = (TIMELINE.SEQUENCE == 1)
    [dvIO,2] = (TIMELINE.SEQUENCE == 2)
    [dvIO,3] = (TIMELINE.SEQUENCE == 3)
    [dvIO,4] = (TIMELINE.SEQUENCE == 4)
    [dvIO,5] = (TIMELINE.SEQUENCE == 5)
    [dvIO,6] = (TIMELINE.SEQUENCE == 6)
    [dvIO,7] = (TIMELINE.SEQUENCE == 7)
    [dvIO,8] = (TIMELINE.SEQUENCE == 8)

    IF (TIMELINE.SEQUENCE == 8)
    {
	    SEND_STRING dvCONSOLE, 'One more time!'
    }
}
When our touchpanel comes online, it will emit a double beep thanks to the ADBEEP command we send it. How did I know about this command? You can find available commands listed in the AMX Product Information (another resource that’s hard to find online now). This is a handy way to know when the program is up and running since there’s a long boot cycle on the NI controllers.

What happens if the device number on our touchpanel gets changed?
If I change it to 10002, it will still connect to our controller, but nothing in our program handles device 10002.
If I change the device number back to 10001, we’ll hear a double beep again because the touchpanel will trigger another online event.
Button Events
We’re going to create a very simple touchpanel layout for now: one main page and two pop ups:


To handle button presses, we need to use BUTTON_EVENTs. We can respond to pushes, releases, and holds. Lets add logic to turn the system on and off:
DEFINE_EVENT

DATA_EVENT[dvTP1]
{
    ONLINE:
    {
	    SEND_COMMAND dvTP1, 'ADBEEP'
    }
}

BUTTON_EVENT[dvTP1,1] // Touch to Start System
{
    PUSH:
    {
	    TO[BUTTON.INPUT]

	    SEND_COMMAND dvTP1,'@PPK-Start System'
	    SEND_COMMAND dvTP1,'@PPN-Source Selection'
    }
}

BUTTON_EVENT[dvTP1,2] // Power Off
{
    PUSH:
    {
	    TO[BUTTON.INPUT]

	    SEND_COMMAND dvTP1,'@PPK-Source Selection'
	    SEND_COMMAND dvTP1,'@PPN-Start System'
    }
}

TIMELINE_EVENT[TL_LOOP]
{
    [dvIO,1] = (TIMELINE.SEQUENCE == 1)
    [dvIO,2] = (TIMELINE.SEQUENCE == 2)
    [dvIO,3] = (TIMELINE.SEQUENCE == 3)
    [dvIO,4] = (TIMELINE.SEQUENCE == 4)
    [dvIO,5] = (TIMELINE.SEQUENCE == 5)
    [dvIO,6] = (TIMELINE.SEQUENCE == 6)
    [dvIO,7] = (TIMELINE.SEQUENCE == 7)
    [dvIO,8] = (TIMELINE.SEQUENCE == 8)

    IF (TIMELINE.SEQUENCE == 8)
    {
	    SEND_STRING dvCONSOLE, 'One more time!'
    }
}
We’ve created two event handlers. Channel 1 corresponds to the Start System button, and channel 2 corresponds to the Power Off button.
What’s that weird TO[BUTTON.INPUT] doing? TO allows us to make a channel go high for as long as the PUSH is held high. It’s a shortcut so we can make button feedback match how long the button’s been pushed.
BUTTON is a special variable we can reference inside a BUTTON_EVENT that tells us which button triggered the handler. BUTTON.INPUT points to the DEVICE and CHANNEL (or DEVCHAN for short) that has the button that caused the event.
So if we put that all together, we’re just saying: whichever button was pushed, show that it was pushed.
The commands we send to dvTP1 show and hide our two different pop ups: Source Selection and Start System. The @PPN and @PPK commands are also referenced in Product Information.
DEFINE_PROGRAM
One section we’re not going to add to our program is DEFINE_PROGRAM. Historically, DEFINE_PROGRAM could be used to drive panel feedback, periodically poll devices, etc. AMX discourages its use on the NX platform and you really don’t need it on the NI platform either.
Way back in the Axcent3 days, DEFINE_START and DEFINE_PROGRAM were the whole program. DEFINE_START runs once when the controller finishes booting, then DEFINE_PROGRAM runs continuously after that. If you had a long program, it could take a while to run once through mainline. This might slow down processing and give you an unresponsive UI.
NetLinx improved upon this by switching to an event-based model. We can have a gigantic program now split into event handlers, and the only code that runs is what’s needed to process events. If an event fires off but no handler is defined, NetLinx runs the mainline program in DEFINE_PROGRAM instead. You could still use this section to handle UI feedback, but you didn’t have to.
With the NX platform, modifying variables can trigger the mainline program to execute again. If you do this in DEFINE_PROGRAM, what you end up with is constantly triggering mainline to run and eventually your program can no longer service events as they happen. Feedback can be handled directly by the events themselves and nothing needs to be placed in DEFINE_PROGRAM.
So in our program and modules, we won’t be using DEFINE_PROGRAM.
Next Time
In the next post, we’ll look at simulating the system environment so we can test out different parts of our program. If you’d like to grab copies of the code and touchpanel files, they’re available on GitHub.
Thanks for reading!

5 thoughts on “NetLinx: Your First Program”